Service Level Agreement (SLA) Setup
Configure SLAs at Division, Customer, and Helpdesk levels with options to exclude weekends, public holidays, and manage site access times.
In This Guide
Overview
Service Level Agreements (SLAs) can be difficult to manage in the Facility Maintenance industry. There are many things to consider such as customer requirements, specific site needs, and asset or equipment requirements. You may also need to determine how to handle weekend days, public holidays, or even specific site access times.
Facilitease has developed robust SLA management taking into account all of the possible requirements noted above. SLAs can be set on the Division, Customer, and/or Helpdesk (if you are using the External Helpdesk Module), and you can choose to exclude weekends, public holidays, and more on any of your SLAs.
Example: P1 and P2 priorities could be 24/7 whereas a P3 or higher could be working days only. The system lets you decide for each priority.
SLA Types
The system supports four different SLA measurements:
- Response SLA - Time to acknowledge and respond to a service request
- Onsite SLA - Time for a technician to arrive at the site
- Functional SLA - Time to achieve a functional/temporary fix
- Resolution SLA - Time to fully resolve the issue
Tip: Some SLAs may only have one or two requirements. For example, if you only have a Resolution SLA requirement, simply give all SLAs the same value and time unit. See SLA Date Scenarios for examples of how SLAs are calculated.
1. Division SLAs
Setting the SLAs at the Division level gives you the ability to add multiple Customers to that Division and have them all use the Division SLA settings, saving you time on duplicating the SLA setup.
If you do however have a Customer within that Division that has different SLA requirements, you can set up custom SLAs for this Customer only.
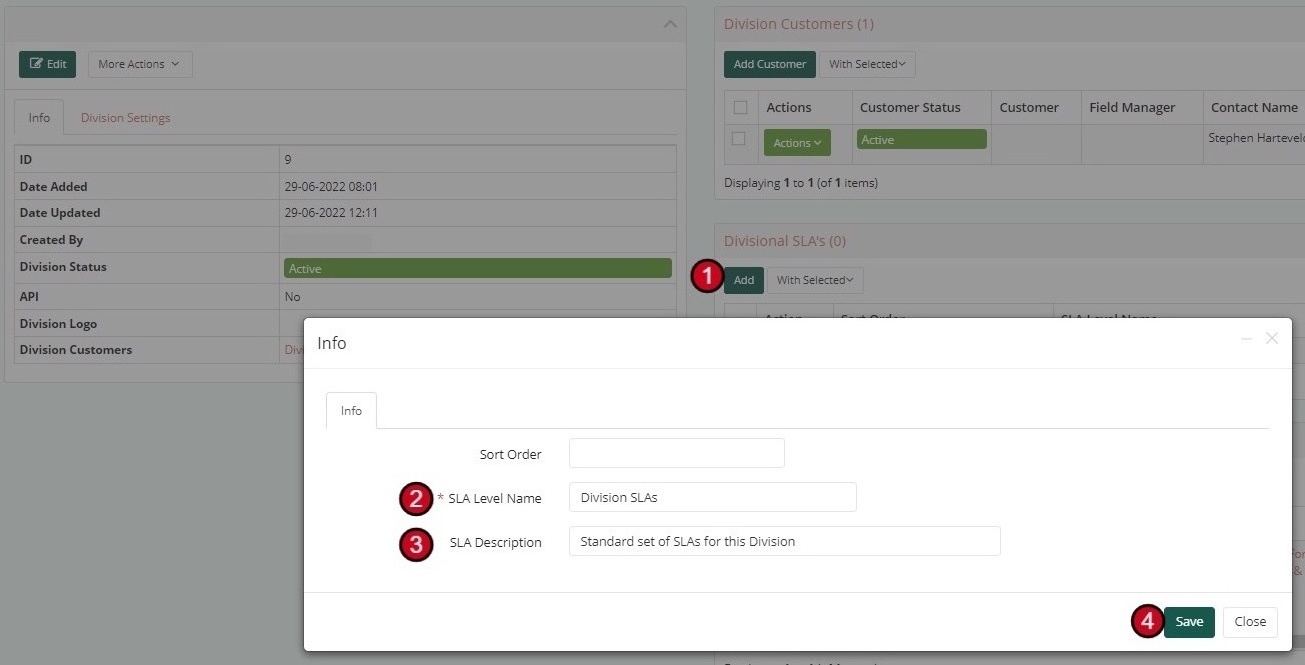
Creating a Division SLA
-
Navigate to Division
Once you have created your Division and want to set up SLAs, click on the 'Add' button under Divisional SLA's
-
Enter SLA Name
Give your SLAs a Name (e.g., "Division SLAs")
-
Add Description
Add a description if required (e.g., "Standard set of SLAs for this Division")
-
Save
Click 'Save' to create the Divisional SLA item
You will now see the Divisional SLA item you just created. Select this item to apply the settings.
2. Division SLA Settings
After creating the Division SLA, you need to configure the specific settings for each priority level.
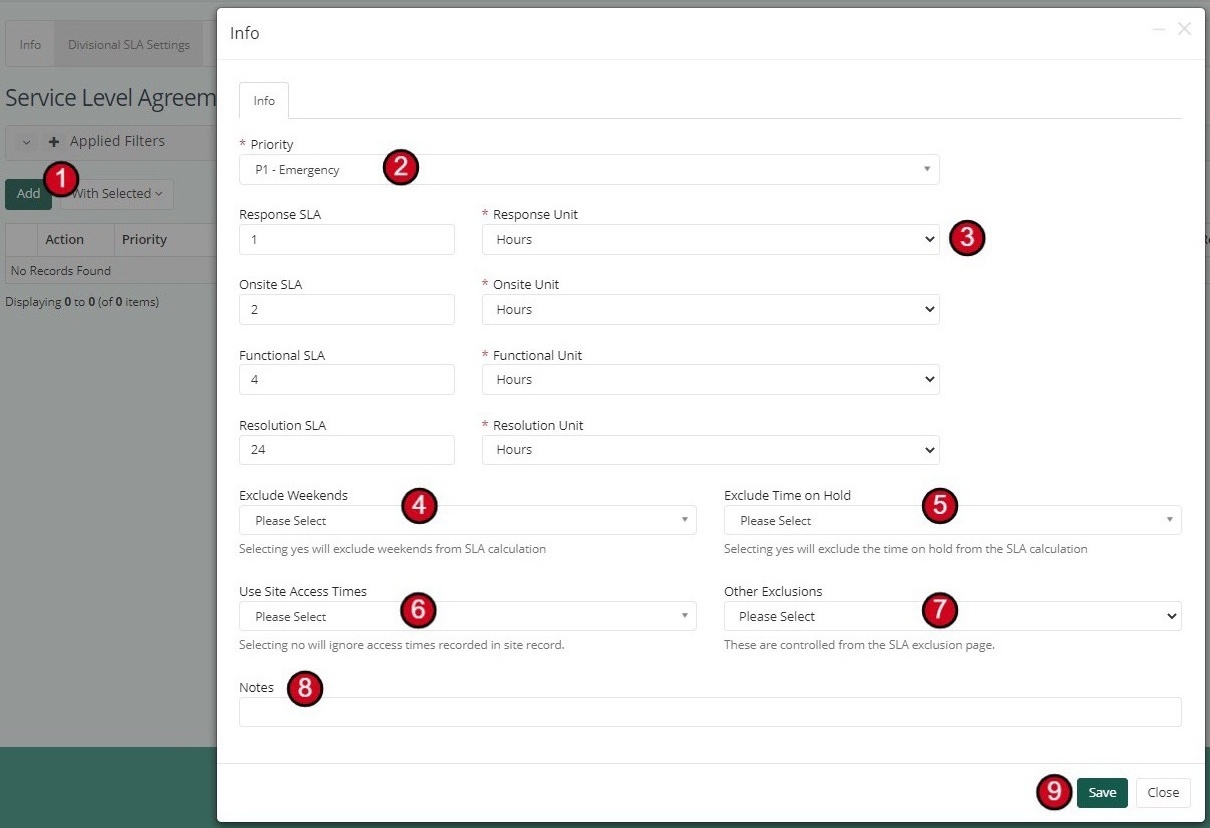
Configuring SLA Settings
-
Add Settings
Select the Division SLA you just created, click the 'Add' button to start adding the settings
-
Select Priority
Select which Priority you want to apply settings to (e.g., P1 - Emergency)
-
Set SLA Times
Add the number and time unit required for each of the SLAs:
SLA Type Value Unit Response SLA 1 Hours Onsite SLA 2 Hours Functional SLA 4 Hours Resolution SLA 24 Hours -
Exclude Weekends
Choose if this priority should 'Exclude' weekends from SLA calculation
-
Exclude Time on Hold
Choose if this priority should 'Exclude' any On hold days from SLA calculation
-
Use Site Access Times
Choose if this priority should 'Include' any Site access times (configured at Site level)
-
Other Exclusions
Choose if this priority should 'Include' any other Exclusions (configured at the SLA Exclusion page)
-
Add Notes
Add any notes or other details
-
Save
Click 'Save'
Important: Repeat this process for ALL priorities that you need (P1, P2, P3, P4, P5, etc.)
3. Customer SLA Settings
When setting up a new Customer, you must choose the SLA Type:
- Standard - Will use the SLAs on the Division
- Custom - Will allow you to set up a new set of SLAs specific to that Customer
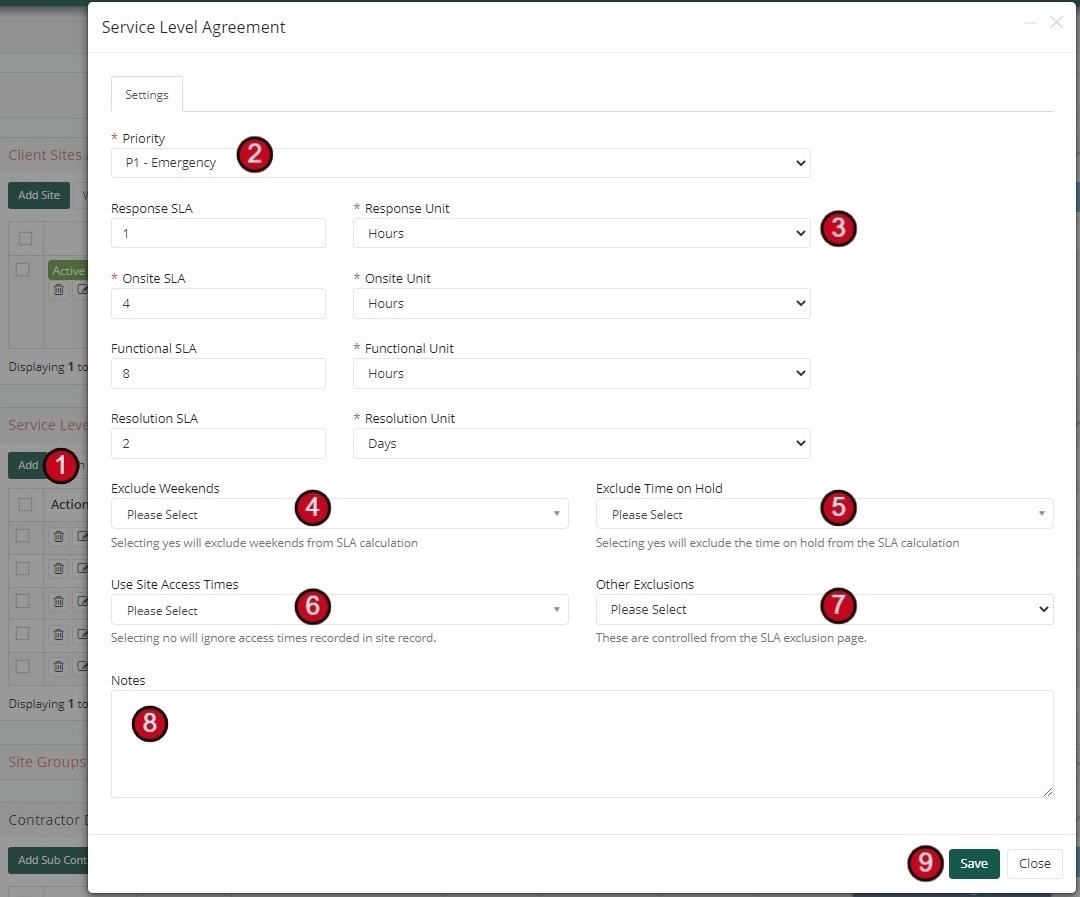
Creating Custom Customer SLAs
-
Access SLA Section
From inside the Customer record, look to the Service Level Agreement section on the right hand side and click the 'Add' button
-
Select Priority
Select which Priority you want to apply settings to
-
Set SLA Times
Add the number and time unit required for each of the SLAs
-
Exclude Weekends
Choose if this priority should 'Exclude' weekends
-
Exclude Time on Hold
Choose if this priority should 'Exclude' any On hold days
-
Use Site Access Times
Choose if this priority should 'Include' any Site access times
-
Other Exclusions
Choose if this priority should 'Include' any other Exclusions
-
Add Notes
Add any notes or other details
-
Save
Click 'Save'
Tip: Repeat this process for ALL priorities that you need.
4. Helpdesk SLA Settings
If you are using the External Helpdesk module and wish to set up SLAs against your Helpdesks, you need to specify this in the Module setup. Discuss with the Unicloud team if you are unsure how this works or how to apply the setting.
Important: Setting the system to use Helpdesk SLAs will override any Division and Customer SLA settings.
Configuring Helpdesk SLAs
-
Navigate to Helpdesk Settings
Once you have set up your Helpdesk, click on the Helpdesk SLA Settings tab along the top
-
Add Settings
Click the 'Add' button to start adding the settings
-
Select Priority
Select which Priority you want to apply settings to
-
Set SLA Times
Add the number and time unit required for each of the SLAs
-
Configure Exclusions
Set your preferences for excluding weekends, time on hold, site access times, and other exclusions
-
Add Notes
Add any notes or other details
-
Save
Click 'Save'
Repeat this process for ALL priorities that you need.

5. SLA Exclusion Types
There are two additional entities under System Details called SLA Exclusion Dates and Exclusion Types. Before you can set up the SLA exclusion dates, you will first need to create your Exclusion Types.
Exclusion Types allow you to group your exclusion dates and apply settings such as which Division, Customer, and Sites the exclusion dates will apply to.
Creating Exclusion Types
-
Navigate to System Details
From the side menu, select System Details
-
Select SLA Exclusion Dates
Now select SLA Exclusion Dates
-
Select Exclusion Types
Now select Exclusion Types
-
Add New Type
Click on the 'Add' button and a new window will appear
-
Enter Name
Give your Exclusion Type a name (e.g., "Public Holiday")
-
Set Status
Set Status to 'Active'
-
Add Notes
Add any notes if required
-
Select Divisions
Select the relevant Divisions or choose to apply it to ALL
-
Select Service Types
Select the relevant Service Types or choose to apply it to ALL
-
Select Regions
Select the relevant Regions or choose to apply it to ALL
-
Select Global Site Groups
Select the relevant Global Site Groups or choose to apply it to ALL
-
Select Customers
Select the relevant Customers or choose to apply it to ALL
-
Select Customer Site Groups
Select the relevant Customer Site Groups or choose to apply it to ALL
-
Select Sites
Select the relevant Sites or choose to apply it to ALL
-
Save
Click 'Save'

6. SLA Exclusion Dates and Settings
Once you have set up your Exclusion Types, you can start adding the dates you want to add SLA Exclusions for.
Creating Exclusion Dates
-
Navigate to System Details
Select System Details from the side menu
-
Select SLA Exclusion Dates
Now select SLA Exclusion Dates
-
Add New Exclusion
Click the 'Add' button and a new window will appear
-
Enter Title
Give your Exclusion a Title (e.g., "Christmas Day")
-
Set Status
Set the Status to Active
-
Select Exclusion Type
Select the relevant Exclusion Type (e.g., "Public Holiday")
-
Public Holiday Flag
Check Yes or No if it's a public holiday
-
Date Type
Check if it's a single date or a Multi date (date range)
-
Set Dates
Add the date or dates that are to be excluded from any SLAs
-
Recurring Option
Check Yes or No if it Recurs yearly

Additional Settings: You can choose to apply additional settings on the next tab such as which Divisions etc it applies to. This is not required if configured as needed in the Exclusion Type.
7. Site Access Hours
Now included at a Site level is the ability to record a Site's Business Hours and Access Hours.
- Business Hours - Have no impact on the SLAs at all, these will simply be displayed to the Contractor as informational only
- Access Hours - Will impact the SLAs if the settings have been set to Yes at the Division or Customer level
SLA Calculation Example: Customer ABC has a P2 with a Resolution SLA of 2 working days and is set to exclude weekends and take into account any Site Access Hours. The Site currently has access hours of 8am to 5pm Monday to Friday and a P2 request is raised at 4pm on a Friday afternoon.
Result: The Resolution Due Date in this situation would end up being 3pm the following Tuesday. See more examples on the SLA Date Scenarios page.
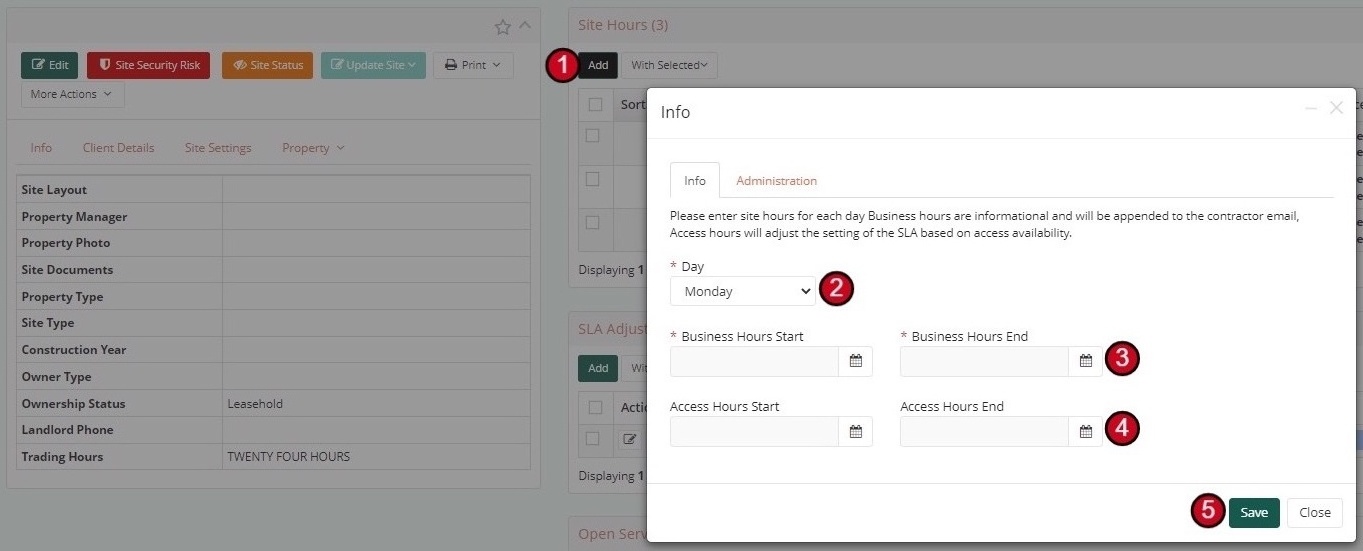
Configuring Site Hours
-
Access Site Record
From inside the Site Record, click the Add button from the Site Hours section on the right hand side
-
Select Day
Select which Day of the week you want to apply the times to
-
Set Business Hours
Select the Business start and end times
-
Set Access Hours
Select the Access start and end times
-
Save
Click Save
Repeat for each day of the week as needed.
8. Site SLA Adjustments
In some rare cases, you may need the ability to Increase or Decrease the time allowed on your SLAs depending on a specific Site.
Example: Customer ABC has pre-set SLAs for their whole portfolio with the exception of Site 123 as it's in a remote location, so your Customer decides that any Requests raised for this Site can have an extra 2 days to complete.
You can specify exactly what Priority it applies to, if the SLA time needs to be added or removed, and how much time is added to each SLA.
Configuring Site SLA Adjustments
-
Access Site Record
From inside the site record, click the Add button in the SLA Adjustments section
-
Select Priority
Select which priority the adjustment will apply to
-
Adjustment Type
Decide if you are extending the time or decreasing
-
Set Adjustment Values
Apply the value and time unit for each SLA
-
Save
Click Save
Repeat process for all priorities if needed.

9. Examples and Scenarios
Here are common scenarios you may come across and how to handle them:
Scenario #1 - Multiple Customers with exactly the same SLAs
- Set up some SLAs at the Divisional level and ensure all these Customers are in that Division
- In the settings of those Customers, ensure they are set to use the Division SLAs
Scenario #2 - A Customer has different SLA requirements to that of the Division
- When setting up this Customer, in the settings you can choose NOT to use the Division SLAs
- Then create new ones for this specific Customer
Scenario #3 - You are using External Helpdesks
- When setting up the External Helpdesks module, you will need to decide if the Helpdesk SLAs are to override any Customer or Division SLAs
- If this is set to Yes, you can add your Helpdesk SLAs in the settings
- If this is set to No, then the Customer and/or Division SLA settings will apply
Scenario #4 - One particular site in a remote location needs extended SLA times
- In the Site itself, you can choose to add an SLA Adjustment against any of the Priorities
- SLA Adjustments can be used to Add time onto an SLA or reduce it, depending on your situation
Scenario #5 - A Customer has strict rules around when a contractor can access one of its sites
- In the Site itself, you can add Access Hours
- Irrelevant of any Division or Customer SLAs, if there are Access hours added to a site, the SLAs will take this into account and adjust the overall due dates accordingly
SLA Priority Hierarchy
Understanding how SLAs cascade through the system: