System Administrator Configuration Guide
This guide provides details for top level Administrators to configure their Unicloud Facilities Maintenance Instance.
1. Work Activity and Tags Setup
Work Activity and tags are available for contractor jobs and through to technician activity. This allows activities to be added to jobs. Each activity can have one or more tags attached to it that will appear on the contractor job and technician activity form. The contractor and technician will be required to accept the activity and requirements of the job.
For example, a permit to work may be required due to the work activity - this will show up on these forms automatically.
Note: Menu items will only show for System Administrators.
To access Work Activities:
- Select System Details menu
- Open Work Activities dropdown
- Select Work Activity List to edit/update activities
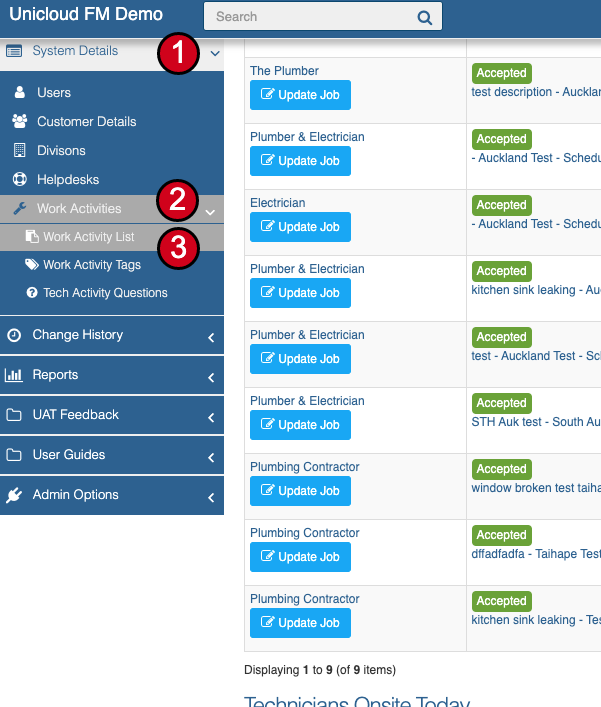
Tip: Tags can be added during the setting up of Work Activities or added/edited by selecting Work Activity Tags in this menu.
1.1 Work Activity List
Work Activity List Dashboard
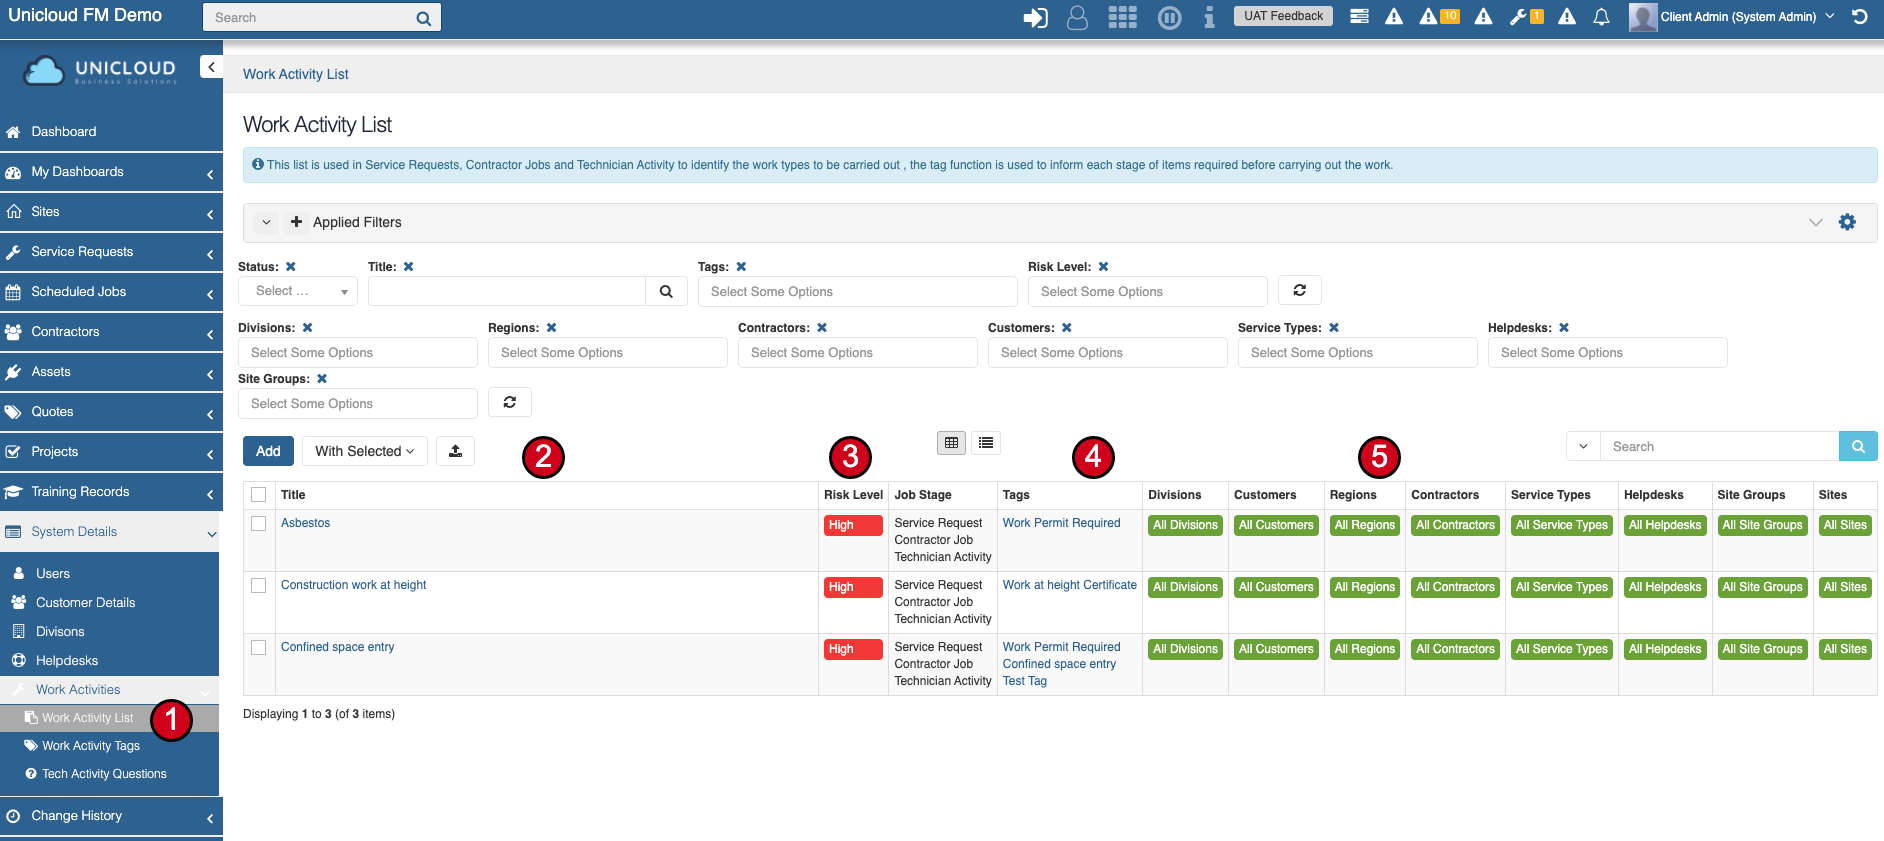
- Select from menu
- List of work activities
- Click the title of an activity to edit
- Click "Add" to add a new work activity
- Risk Level of work activity
- Tags/requirements attached to this work activity
- Filters for where the work activity item can be selected
- Work Activity selections will appear when a contractor is being assigned to a job and for a technician on a job
Important: Work activities will need to be accepted by contractors and technicians prior to job acceptance and work starting.
1.2 Add Work Activity Item
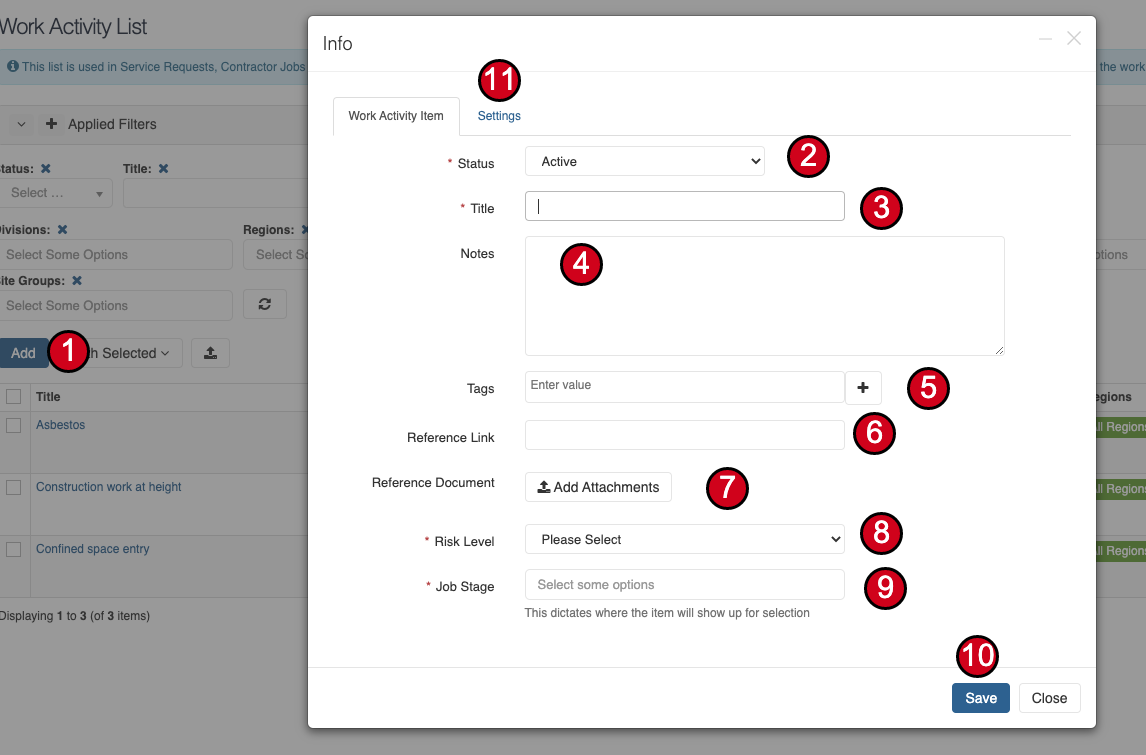
From the work activity list select the Add button, then:
- Activity Status - Once created you cannot delete a work activity, only make it inactive or update it
- Name your work activity - This is the name that will show up in your lists (must be unique)
- Notes - Notes about the work activity
- Tags - This will attach the tags to the work activity (e.g., "Permit Required"). You can add new tags directly here by clicking the "+" symbol. Note: each tag must be unique
- Reference Link - A link for the activity if you wish to link to documentation
- Attachments - Attachments for the activity if you wish to attach reference documents. These will be displayed when the activity is clicked in a list view or item view
- Risk Level - Select the risk level. This will form part of the activity name
- Job Stage - Select the job stage where the activity will be able to be selected (note: this functionality is not available in the current Unicloud version)
- Save - Save the work activity item
- Settings Tab - Update settings/filters
1.3 Work Activity Item Settings/Filters
The settings tab of the work activity item allows you to set filters for where the work activity item will be displayed.
- Select the tab "Settings" in the form
- Make your selections for where you want the item to show
- Example: This item will display for ALL sites and ALL helpdesks but only display for the service type of Electrical
- Save your settings
2. Manage Training Courses
Unicloud Facilities Maintenance allows you to record and track training for users.
When these courses are applied to a Contractor or Contractor Technician and the course is set to required, the technician will not be available to be assigned to jobs until they have confirmed course completion.
On creation of a course or a new user, the course requirements will be added to the new user's records based on the course settings.
To access the Training Course dashboard:
- Select Training Records from the main menu
- Select Training Courses from the dropdown menu
- Use filters to search for a particular course
- Change the dashboard view as needed
Course details explained:
- Active - Means the course is available
- Title - The name of the course; click this to view course contents
- Course Start Date - Allows you to preload courses and set a start date; completion dates will be calculated from this date
- Required - Flags a course as required, meaning the user must complete it; this applies to technicians before they can be allocated to a job
- Complete Within - Set the number of days a user has to complete the course before the required status kicks in
- Recurring - If set, the user will need to renew their course history in their account prior to the due date based on the frequency entered
2.1 Add a Training Course
- Click to add a new course
- Course name - Enter the name of the course
- Active - Set whether the course is available
- Required - Flag if the course is required for job allocation
- Complete Within - Set the number of days to complete
- Description - Enter a description for your course
- Attachments - Add attachments (viewable in the course)
- Link - Enter a link to an external page or document
- Course Start Date - Set when the course begins
- Save - Click save when completed
- Course Settings - Set where a course will be applied
Once a course is created or updated, the settings will be applied to relevant users within a few minutes.
2.2 Course Settings
- When editing or creating a course, click the Settings tab to define where the course is required
- View the main course info tab
- Recurring - If set, the user will need to renew their course history based on the frequency entered
- Set course filters/settings (Divisions, Customers, Contractors, Regions, Service Types, Helpdesks, Access Groups, Site Groups, Sites)
- Save settings
2.3 Training Records / ALL
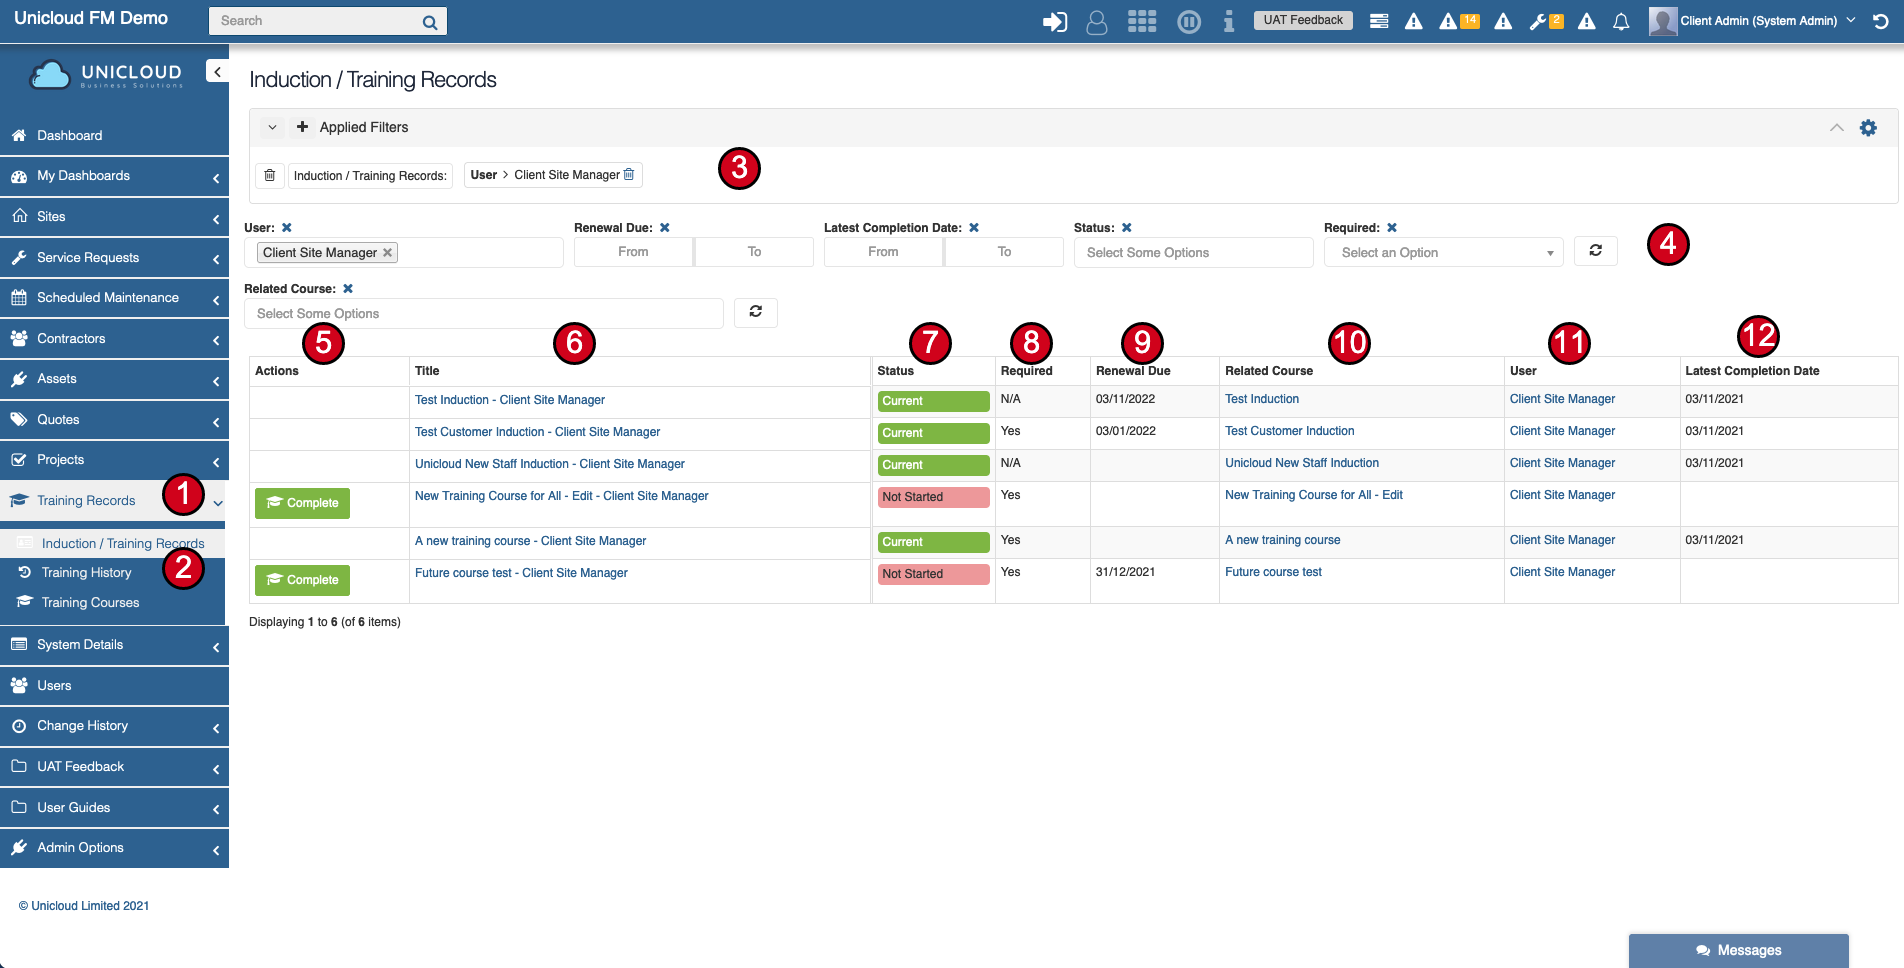
This screen will show admins and users training records for users they have access to.
- Click Training Records in the main menu
- Click Training Records from the dropdown menu
- View applied filters / modify filters
- Quick access filters to easily search records
- If course requires completion, user will be able to complete the course by clicking the complete button
- Title - Course + User's Name (click to view history for that user)
- Current Status:
- Current - Course is current and no action required
- Not Started - The user has not completed this course yet
- Renewal Due - User needs to review and update course history/completion
- Required:
- No - Course is not required for job assignment
- Yes - Course is required and Tech may not be able to be assigned if not completed
- N/A - Course is no longer applicable to the current user but history remains
- Renewal Due - The date that the course is required to be completed by
- Related Course - View the latest course documentation and details
- User Record - The user record
- Latest Completion Date - Shows the last time the course was completed by the user
2.4 Training History
Training History shows all the course history and renewals for all users the logged-in user can see.
- Click Training Records in the main menu
- Click Training History in the dropdown menu
- View and change active filters
- Title - Username - Course - Last Completion Date
- Added By - Who added the history record
- Notes - Notes from the user at the time of adding the history
- Training Record - A link to the main course record for that user
- Date Added - When the history record was added to the system
2.5 View Users Training Records and History
To view a user's training history, navigate directly to that user's page:
- Select Users from the main menu
- Click on the user's name or the 'i' button to view the record
2.6 Users Training Record
Once you have clicked on the user, you will be able to see that user's record and the training courses for that user:
- Main user details
- Info tab
- Current Jobs - View current Technician Activity if the user is a technician
- Courses - Courses for the user
- Induction/Training Records - View all training records for the user
3. Work Activity Tags
Work activity tags get attached to work activity items and will show as requirements for contractors and technicians to acknowledge/accept on jobs.
Note: Only System Administrators can edit/update tags.
To access Work Activity Tags:
- Select System Details from menu
- Select Work Activities dropdown
- Select Work Activity Tags
- View current tags available
- Click Add to add a new tag (note: new tags can be added directly when adding work activity items)
- View notes for tags if entered/required
3.1 Add New Work Activity Tag
After clicking "Add" on the tag screen:
- Status - Set tag status
- Title - Enter name/title for tag (must be unique)
- Notes - Enter any notes if required
- Save - Save the tag
3.2 Technician Sign In Form - Example to Show Activity and Tags
Clicking the sign in button on the email:
- Title - Easy title of job and location
- Arrival on Site - Populated with current time
- Override Arrival Time - Can be overridden if needed (system captures override and reason)
- Expected Time on Site - Technician enters expected time (hours, can include decimals)
- Expected Departure Time - System calculates and displays expected time off site
- Override Location - If geo location fails, technician can override (reason must be provided)
- Work Activity - Work activity required on the job (activities and tags/permits are configurable)
- Tags/Permits - Tags/permits linked to the work activity
- Update Work Activity - Click to edit and record that a change has been made
- Site Review - Confirm that site docs/hazards have been reviewed
- Acknowledge Work Activity - Confirm requirements are in place prior to starting work
- Attachments - Add attachments if required
- Geo Location Warning - Shows if geo location is disabled with instructions to re-enable
- Sign In to Site - Only enabled if within 0.5km of site or location is overridden
- Site Safety Documents - Link to view safety documents (login required)
- Get Directions - Click to get directions to site
Once signed in, the technician will receive a second email with update and sign-out actions. Note: once signed in, the link/button in the original email will not allow you to sign in again.
4. Technician Activity Questions
Tech activity questions allow System Administrators to load questions that are required to be answered at the time a technician signs into site.
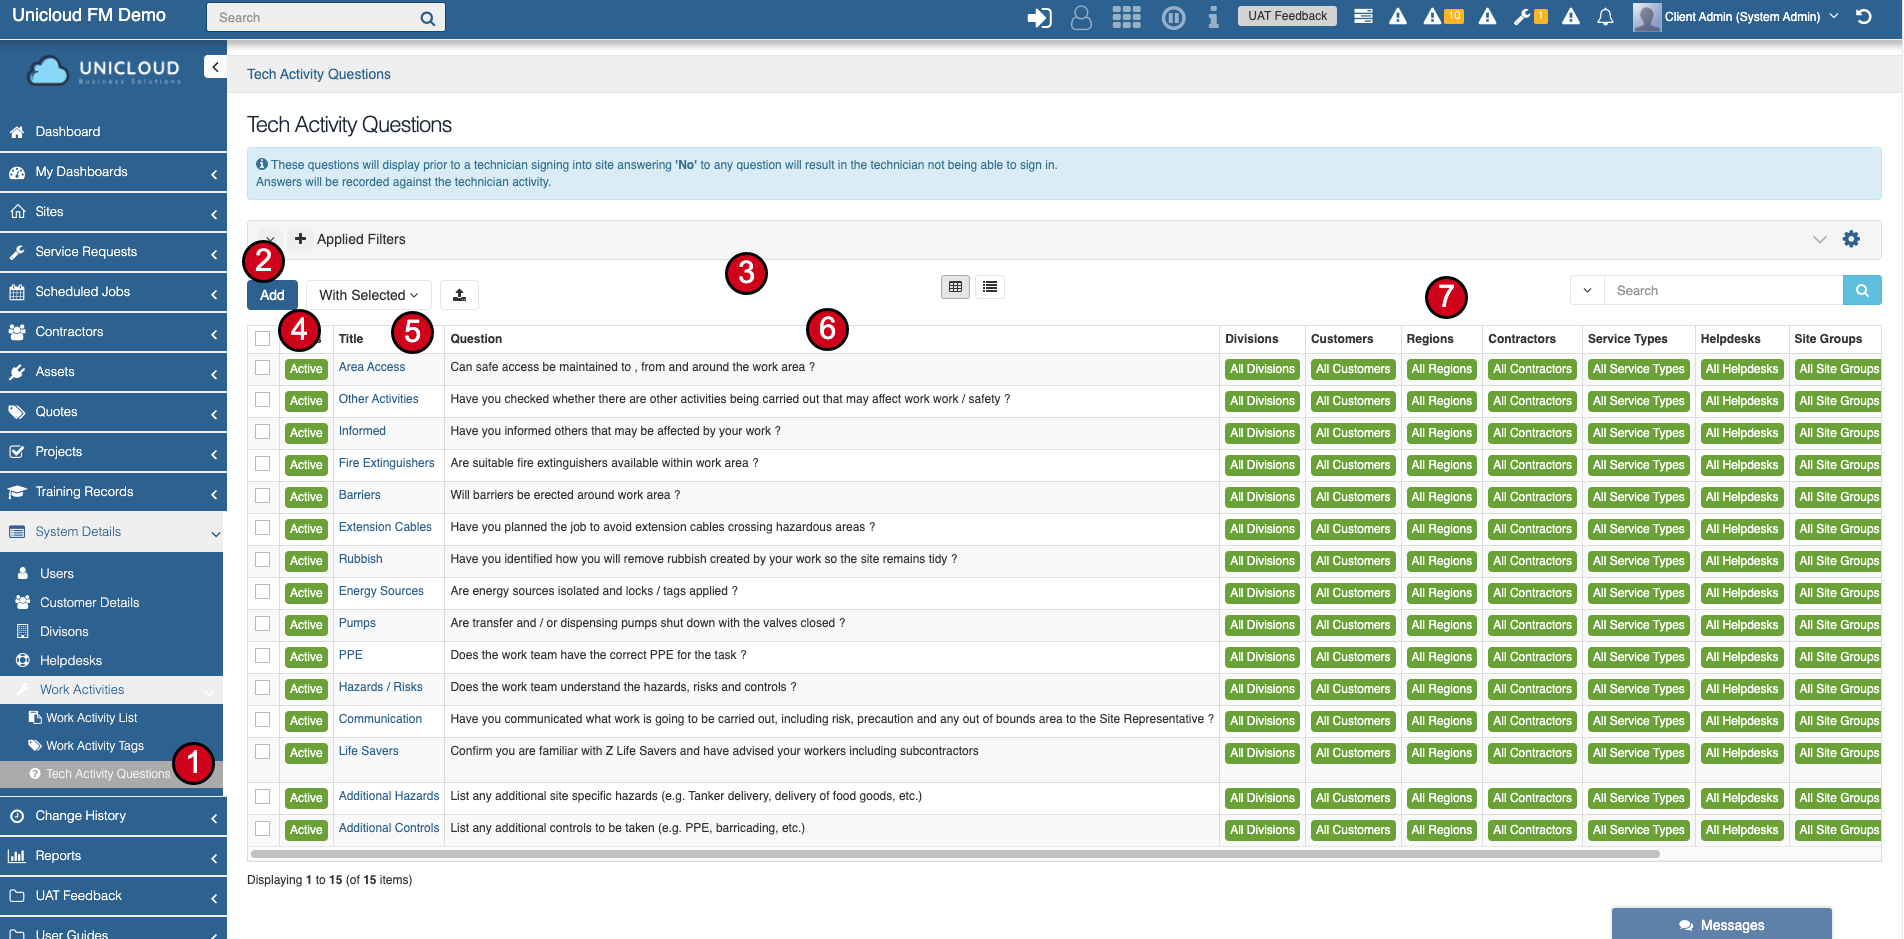
- Menu item - Available for System Administrators to edit/update questions
- Add - Click to add a new question (once added, it cannot be deleted, only made inactive)
- Dashboard - Tech Activity Question dashboard
- Status - Question status
- Title - Question Title
- Question - Question to be displayed
- Settings - Filter/display settings
4.1 Add Technician Activity Question
After clicking the "Add" button, enter question details:
- Status - Set question status
- Title - Enter a short title for the question (must be unique)
- Question - Enter the actual question to appear on the technician sign-in form
- Show Additional Info Text Box:
- Each question can be answered with Yes/No or N/A
- This allows you to decide for which answers the additional required text box will appear
- Answered questions will be stored against the tech activity record
- Save - Save question details
- Settings Tab - Click to update question settings/filters
4.2 Tech Activity Question Settings/Filters
To ensure questions are not showing up where they aren't required, you can set up filters for when each question will show.
For example, you may only want a question to show for electrical work only, or for a particular helpdesk, site, or region.
- Info Tab - Main question information
- Settings Tab - Select to configure filters
- Filter Settings - Set Divisions, Customers, Contractors, Regions, Service Types, Helpdesks, Site Groups, Sites
- Example - A question can be set to only show for electrical jobs with sites in a specific region
- Save - Save settings
4.3 Technician Sign In Form - Example with Questions

When the system administrator has configured required questions, they will be shown on the sign-in form:
- Questions must all be answered prior to being able to sign in
- If a question answer requires more explanation, a required text box will show for the answer
- Questions can be filtered based on Division, Group, Site, Service Type
- The answers to these questions will be stored against the technician activity record
- This captures the question as it was and the answer at the time
5. Helpdesk Setup
Helpdesk setup allows you to create and manage helpdesk settings.
Note: Your Unicloud instance must have helpdesk functionality turned on to enable this setup.
Helpdesks allow the system to have users select the helpdesk and assign Service Requests, Quotes, Scheduled Maintenance, and Assets to that helpdesk.

To access Helpdesk setup:
- Select System Details from main menu
- Select Helpdesks
5.1 Add Helpdesk and Helpdesk Setup Dashboard
The Helpdesk dashboard allows you to view basic helpdesk settings and add helpdesks:
- Add - Click to add a new helpdesk
- Details - Displays details about helpdesk:
- Active - Means the helpdesk will be selectable
- Click the name of the helpdesk to view and edit details
- Filters - Show where the helpdesk will be visible (e.g., a helpdesk may only service a particular region, site group, or site)
5.2 Helpdesk Main Settings
- Helpdesk Name - The helpdesk title
- Status - Helpdesk status (you cannot delete a helpdesk, only make one inactive)
- Notification Email - Helpdesk email to receive notifications
- Contact Phone - Helpdesk phone number
- Description - Helpdesk description (if required)
- Additional Helpdesk Questions - Items entered here will display when logging a new service request and require the user to provide an answer
- Save - Save Helpdesk
5.3 Helpdesk Settings Tab
Helpdesk settings and filters:
- Select Settings tab
- Email Settings - Select entities to receive emails for (Service requests, Scheduled maintenance, etc.)
- Filters - Select filters for the sites this helpdesk will be able to be selected (Divisions, Regions, Customers, Site Groups, Sites)
- Save - Save settings