Contractor Job Management
Learn how to assign, manage, and track contractor jobs from both the helpdesk and contractor perspectives.
Overview
Contractor Job Management in Facilitease enables seamless collaboration between helpdesk staff and contractors. This guide covers both perspectives of the job lifecycle.
Job Lifecycle
Two User Perspectives: This guide covers functionality for two types of users:
- Helpdesk Users - Assign jobs, track progress, manage service requests
- Contractors - Accept/decline jobs, provide updates, complete work
Helpdesk Dashboard
The helpdesk dashboard provides an overview of all jobs and quick access to common actions.
Dashboard Quick Stats
From the dashboard, you can:
- View new jobs that need assignment
- Click Assign Job to assign a contractor
- Click General Update to add comments to a job
- Click on a job title to view full details
Assign Job
Assigning a contractor to a service request is a key step in the job workflow.
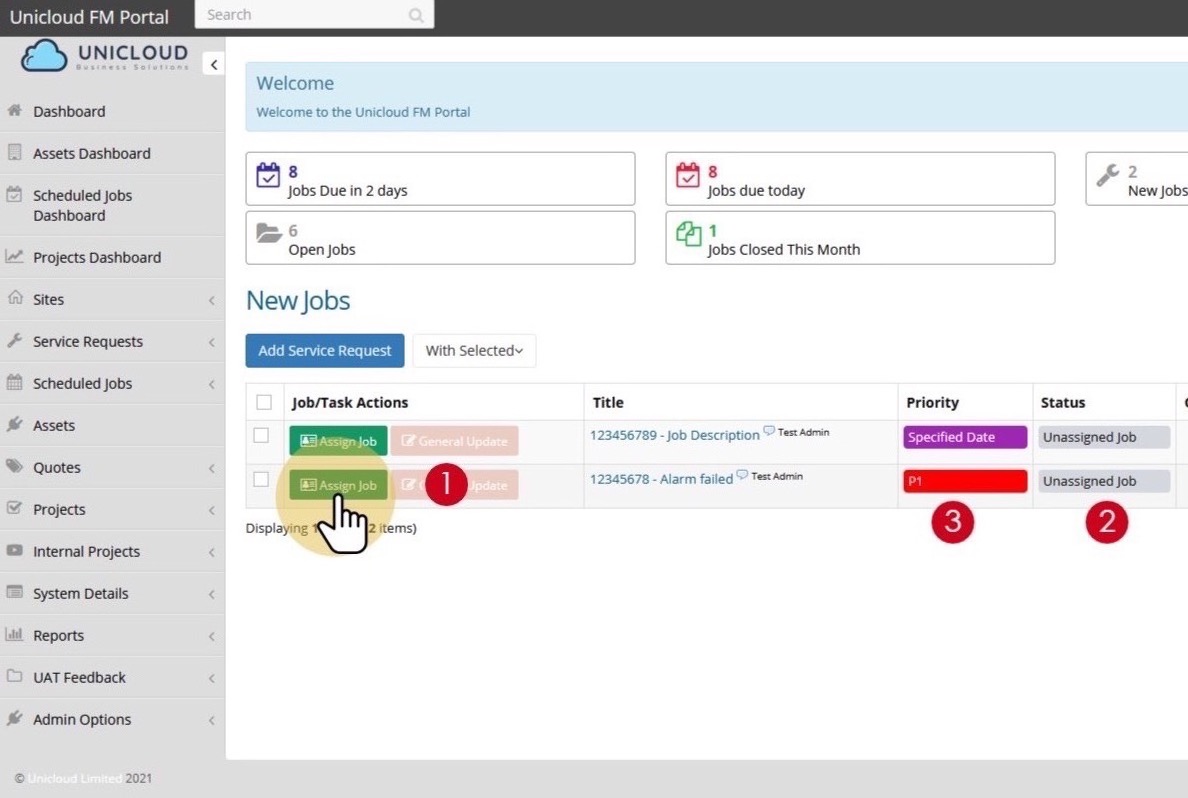
Where to Find Unassigned Jobs: All unassigned jobs (jobs with no contractor added) will show on your dashboard under New Jobs. You can click the Assign Job button from the dashboard or from within the job record.
- Click Assign Job - Click the Assign Job button from your helpdesk dashboard or from within the job record.
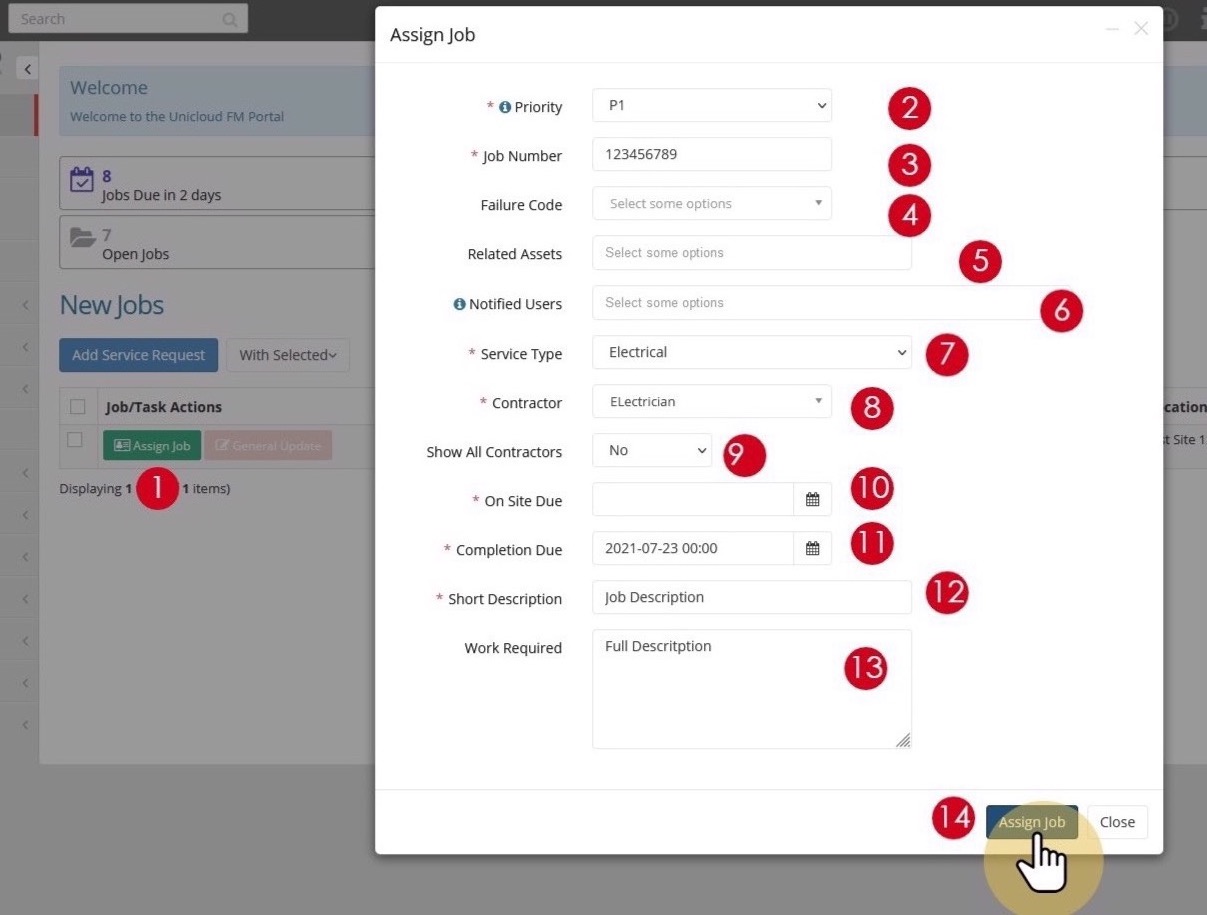
- Set Job Priority - Check or set the job priority level. This will set the job SLA dates according to the SLA configured for the customer.
- Enter Job Number - Enter your Job Number (some systems allow auto-generated job numbers).
- Select Failure Code (Optional) - Enter the Failure Code if required for categorisation.
- Attach Asset (Optional) - You can attach an asset to the job if one is associated with the service request.
- Add Notified Users (Optional) - Add users who should receive notifications about this job, in addition to the standard users.
- Select Service Type - Select the services or trades required (e.g., Electrical, Plumbing, HVAC).
- Select Contractor - Choose the contractor for the job. The contractor list will be filtered based on the service type/trade selected and approved contractors for the customer (if configured).
- Show All Contractors (Optional) - If your system admin allows, you can turn off contractor filtering by selecting Yes to show all contractors in the system.
- Set On Site Due Date - Select the date and time you require the contractor to be on site.
- Set Completion Due Date - Select the date and time the work should be completed. This field automatically populates with the service request Completion Due date but can be changed.
- Enter Short Description - Provide a short description for the contractor. This initially populates from the main request but can be customised.
- Enter Work Required - Provide details about what work is required. This field auto-populates from the main request but can be modified for specific contractor requirements.
- Click Assign Job - Click Assign Job to add this contractor to the job. The contractor will receive a notification.
Adding Multiple Contractors: The Assign Job button only allows you to add one contractor. To add more contractors, use the Add Contractor button from within the job record after the first contractor is assigned.
View Open Jobs / Requests
Track all your open jobs and their current status from the Open Jobs report.
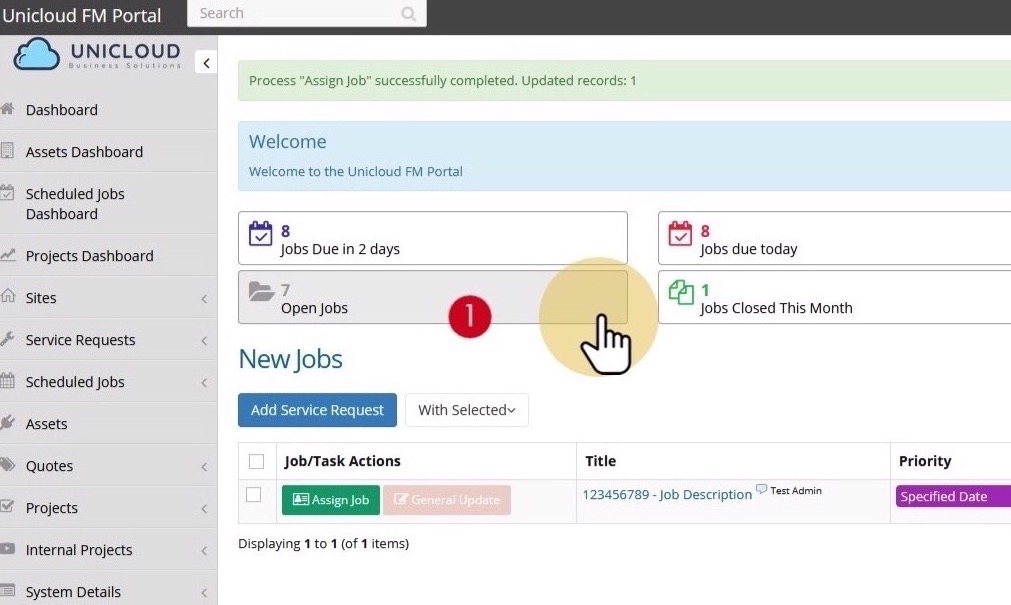
- Click Open Jobs - Click on the Open Jobs counter on your dashboard to view all current open jobs.
- View Job Details - Click on any job title to view the full job record.
- View Last Comment - Mouse over the speech bubble icon next to the job name to see the last comment/action on that job.
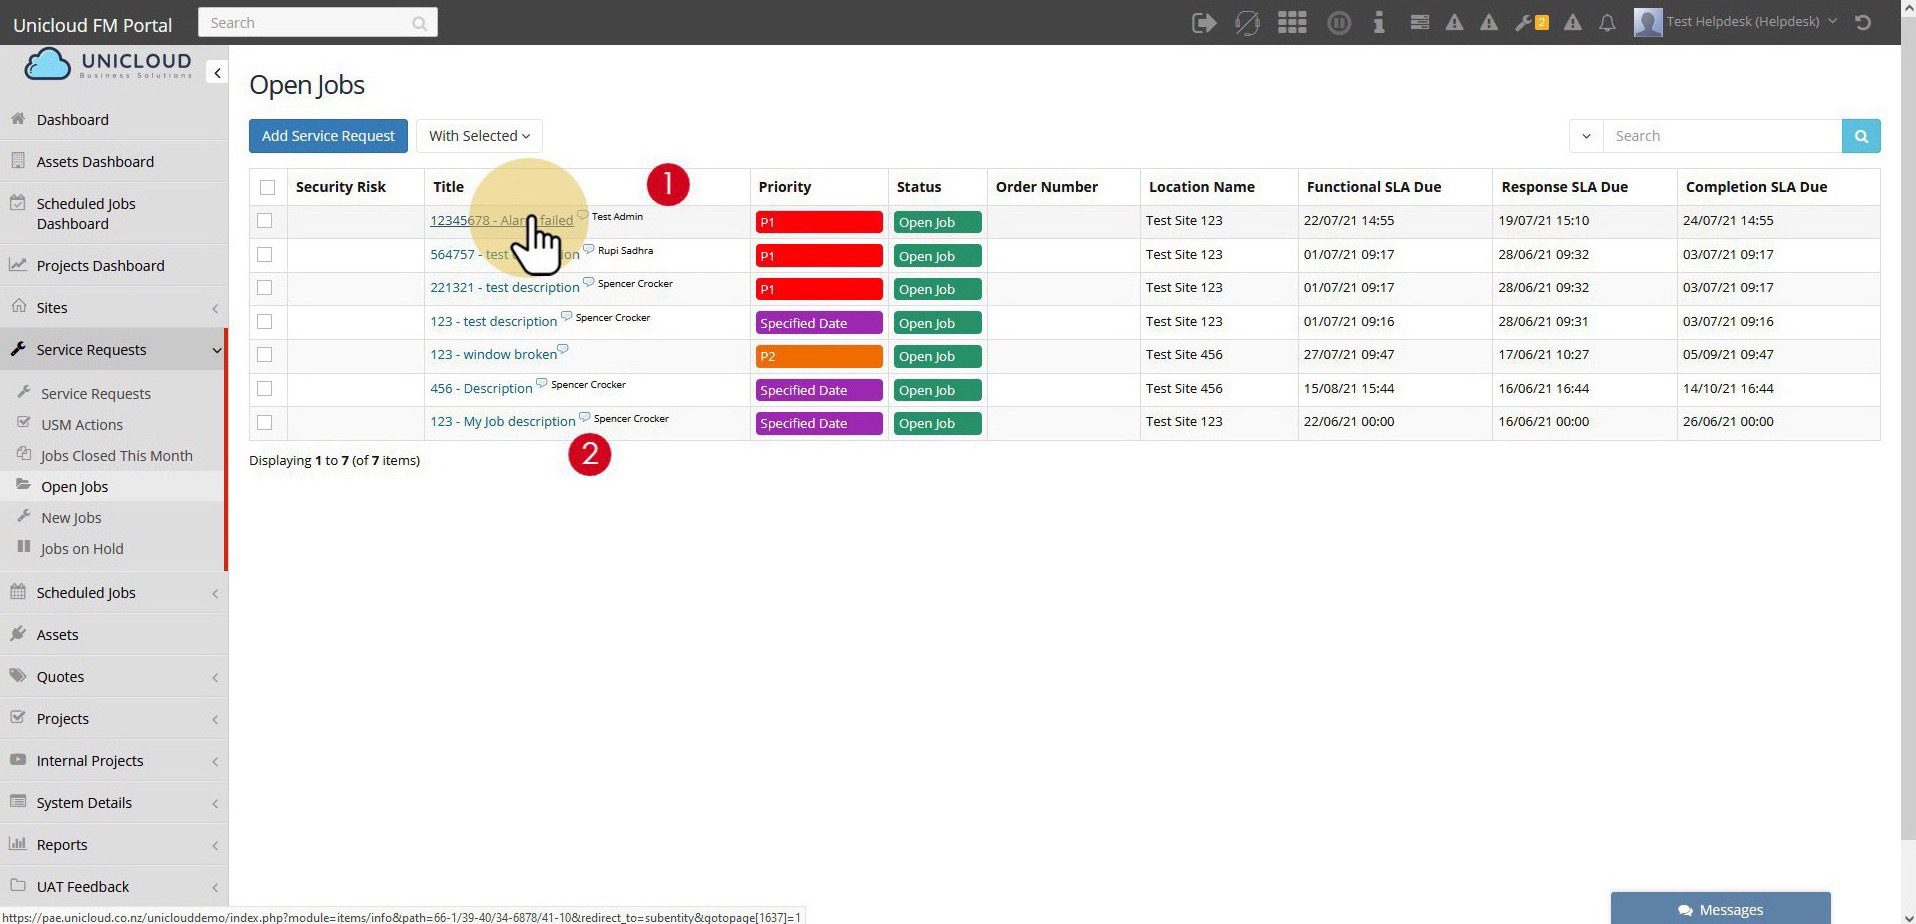
Open Jobs List Columns
| Column | Description |
|---|---|
| Title | Job description - click to open the job record |
| Priority | Job priority level (P1, P2, Specified Date, etc.) |
| Status | Current job status (Open Job, Unassigned, etc.) |
| Order Number | External reference number if provided |
| Location Name | Site where work is required |
| Functional SLA Due | Date/time for functional completion |
| Response SLA Due | Date/time for initial response |
| Completion SLA Due | Date/time for full completion |
Job / Service Request Record
The job record provides comprehensive information and actions for managing service requests.
Job Record Tabs
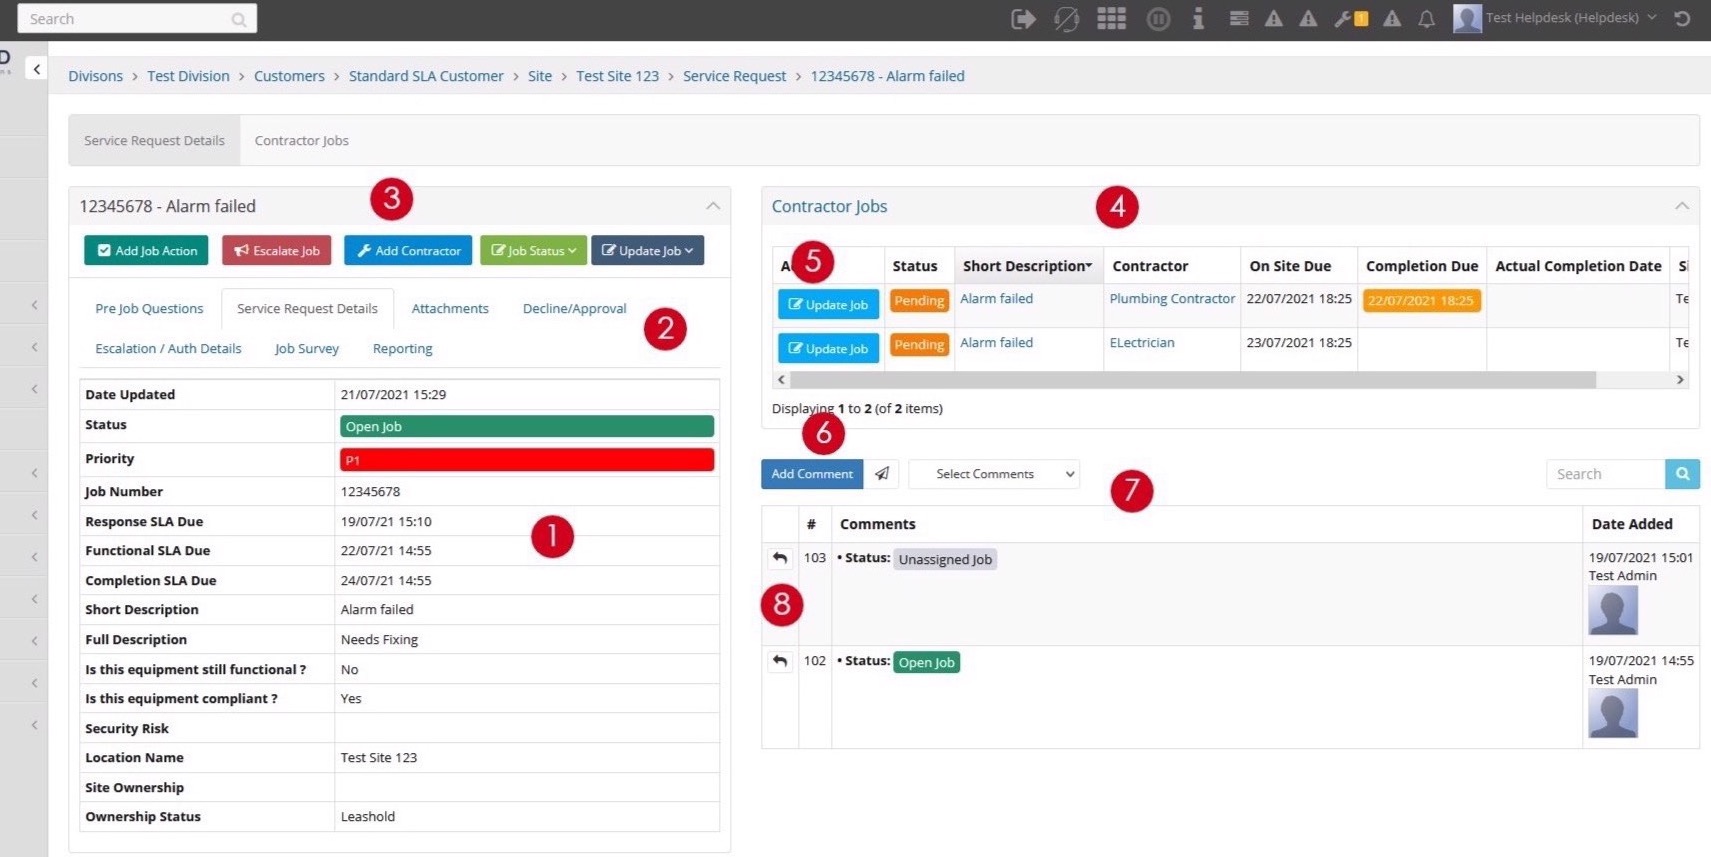
Available Actions
| Button | Description |
|---|---|
| Add Contractor | Add additional contractors to the job |
| Escalate Job | Escalate the job to a higher level |
| Job Status | Change job status including putting on hold or closing |
| Update Job | Update the contractor job with new information |
| Add Comment | Add comments to the job (visible to all parties) |
Contractor Jobs Panel
The job record displays all assigned contractors with their status:
- Click on the Short Description to view the contractor's job record
- Click on the Contractor name to view the contractor's main record
- Use the Update Job button to update a specific contractor's job
- View status indicators showing Pending, Accepted, or Completed
Comments Section
The comments section shows all activity on the job:
- Use Add Comment for detailed comments with attachments
- Use the paper plane icon for quick comments
- Use Select Comments dropdown to filter between main job comments and contractor updates
- Click Reply to respond to a specific comment
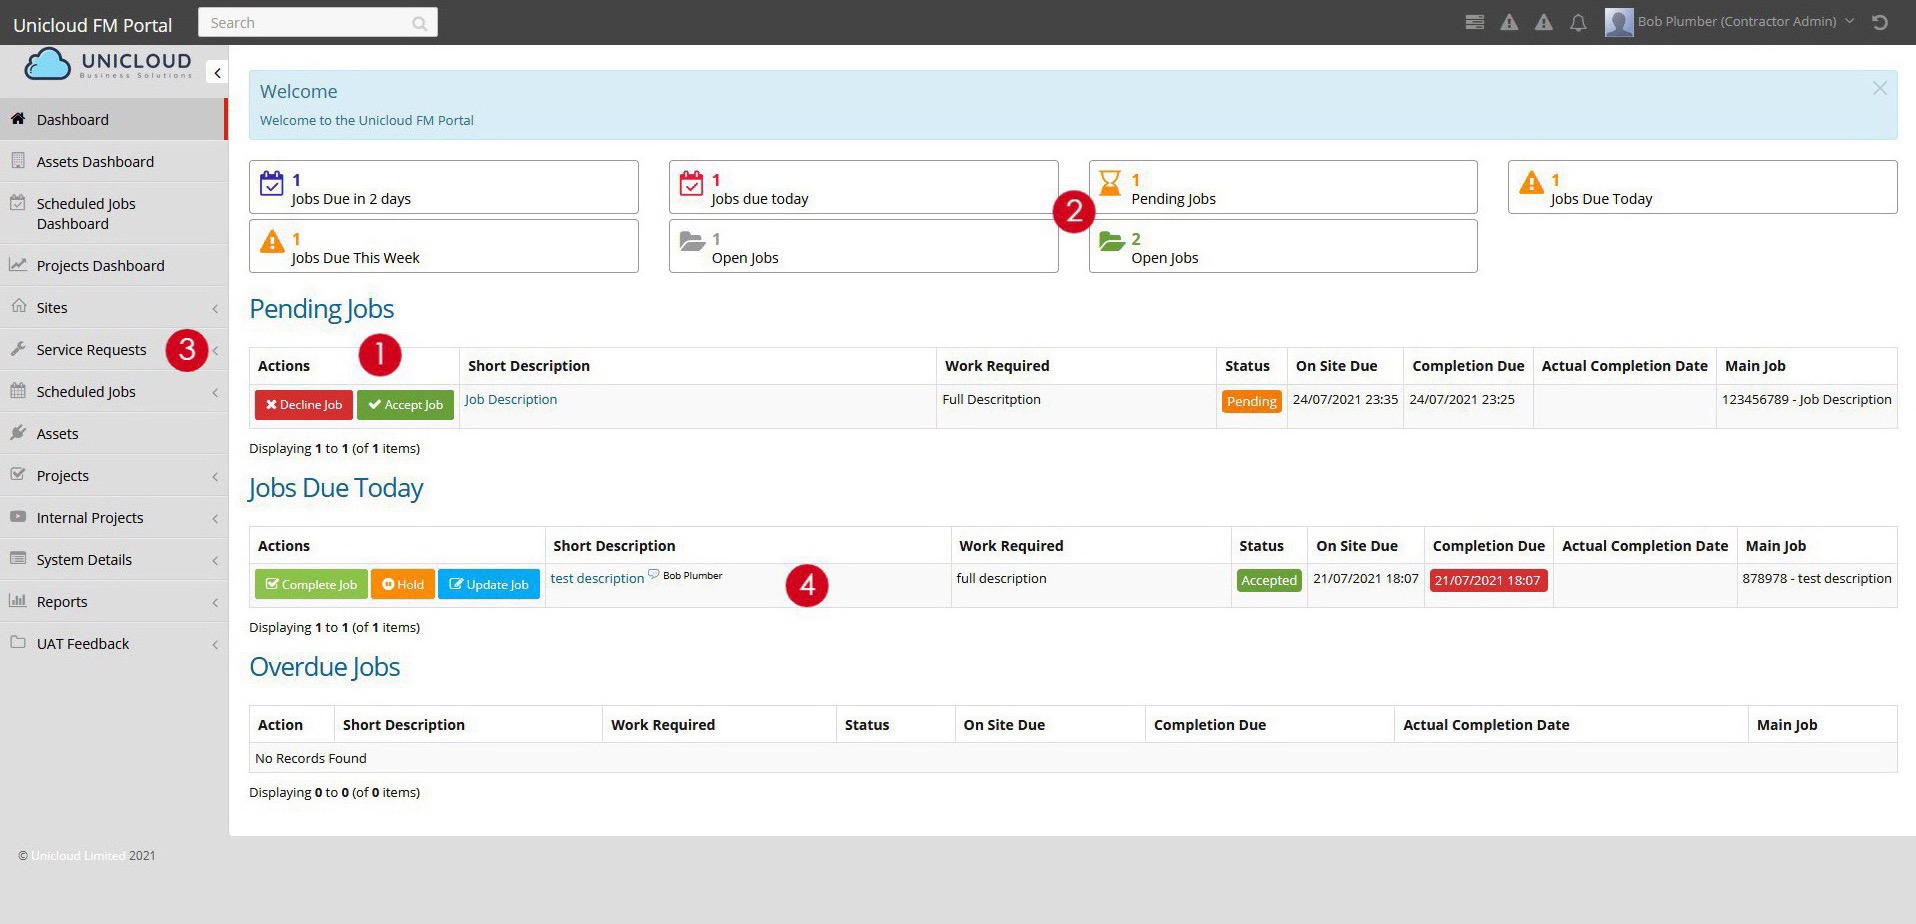
Contractor Dashboard
When a job is issued to a contractor, they will see it on their dashboard with available actions.
Dashboard Sections
Pending Jobs
Jobs awaiting acceptance or decline
Jobs Due Today
Accepted jobs due for completion today
Overdue Jobs
Jobs past their completion due date
Contractors can:
- Use action buttons directly from the job listing
- Click the short description to view the full job and then use action buttons
- Access all jobs via the Service Requests menu
- Use dashboard counters to filter jobs by status
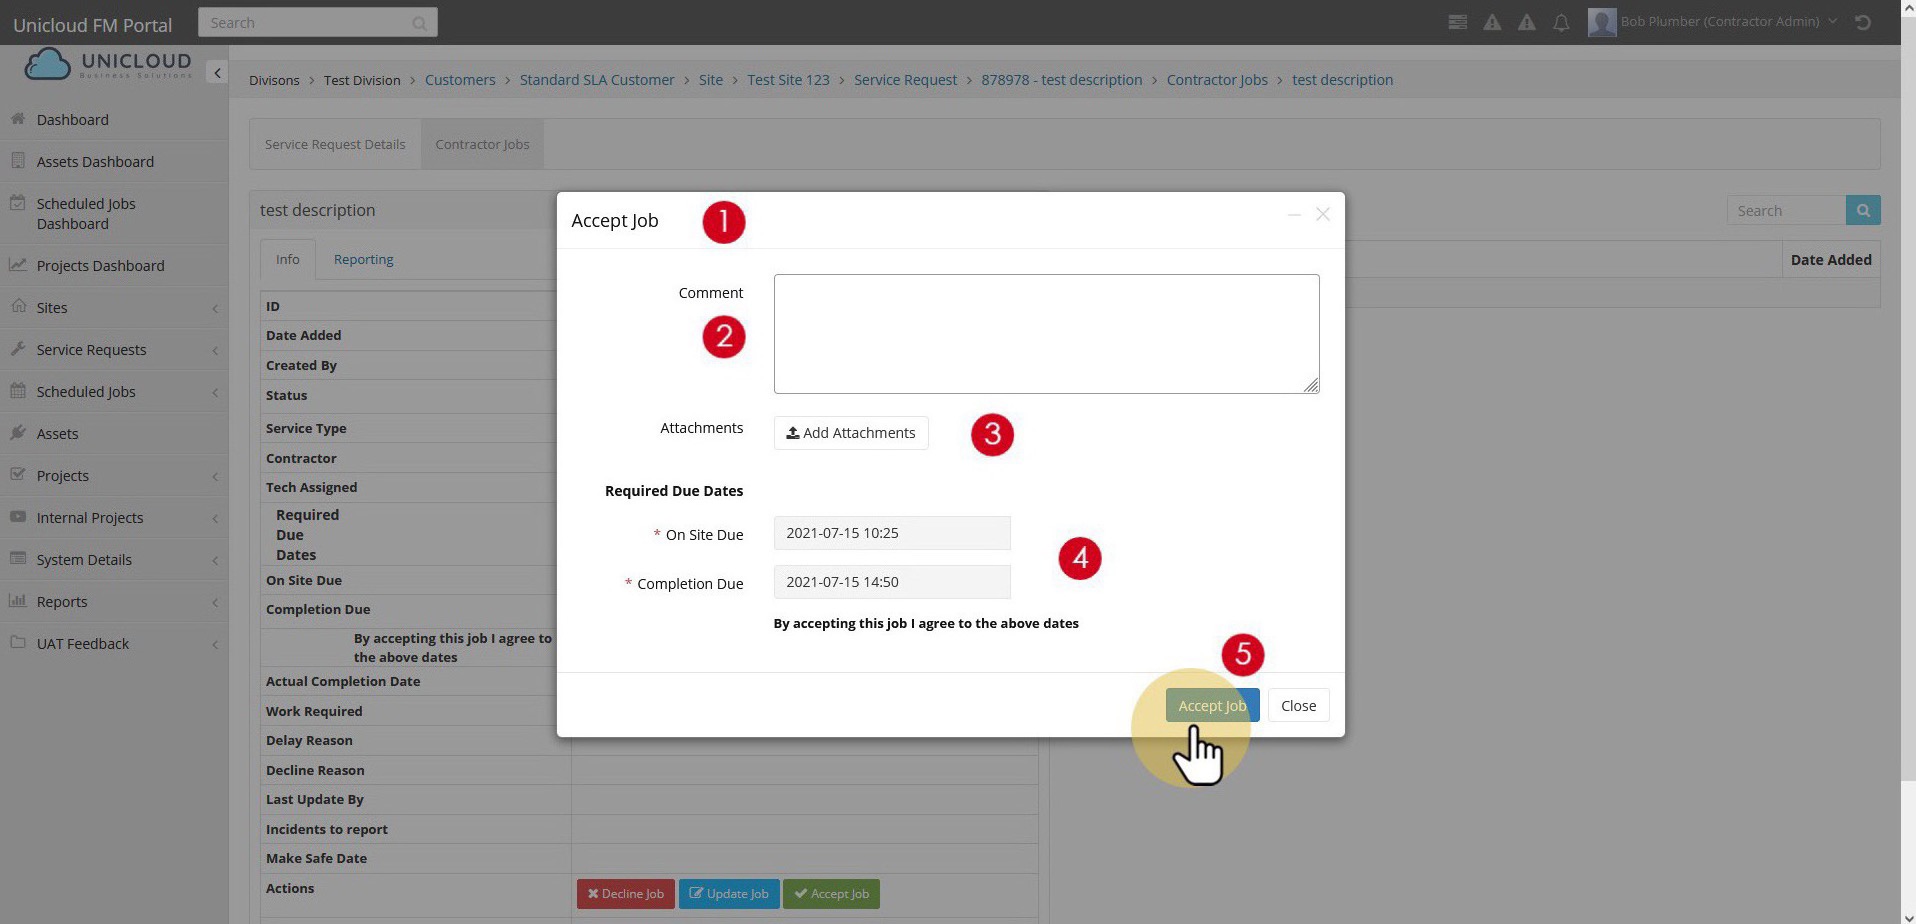
Accept Job
When a contractor accepts a job, they are agreeing to complete the work by the specified dates.
- Click Accept Job - Click the Accept Job button from the dashboard or within the job record.
- Add Comments (Optional) - Enter any comments regarding the acceptance.
- Add Attachments (Optional) - Upload any relevant files or images.
- Review Due Dates - Review the On Site Due and Completion Due dates. By accepting, you agree to these dates.
- Confirm Acceptance - Click Accept Job to confirm. The job status will change to Accepted and then Open.
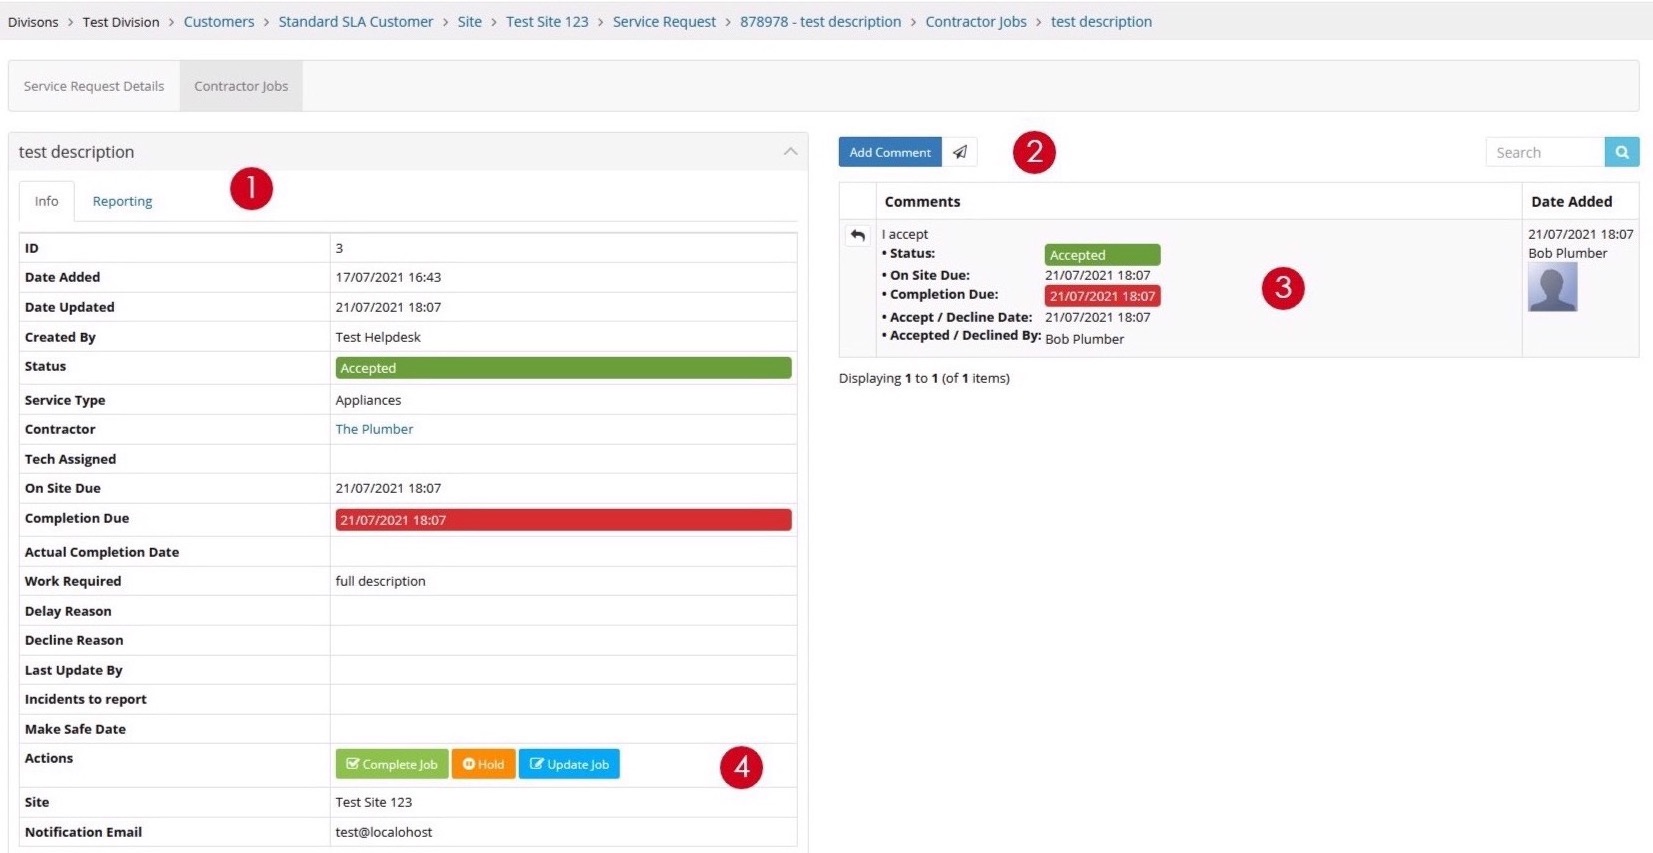
After Acceptance
Once a job is accepted:
- The job status changes to Accepted/Open
- New action buttons become available: Complete Job, Hold, Update Job
- Comments show the acceptance details including dates agreed
- The helpdesk is notified of the acceptance
Decline Job
If a contractor cannot complete a job, they can decline it with a reason.
- Click Decline Job - Click the Decline Job button from the job.
- Enter Comments - Provide comments explaining the decline.
- Add Attachments (Optional) - Upload any supporting documentation if necessary.
- Select Decline Reason - Choose a reason for declining from the dropdown list.
- Suggest Alternative (Optional) - If the wrong service/trade was selected, advise what trade or service is actually required.
- Confirm Decline - Click Decline to confirm. The helpdesk will be notified and can reassign the job.

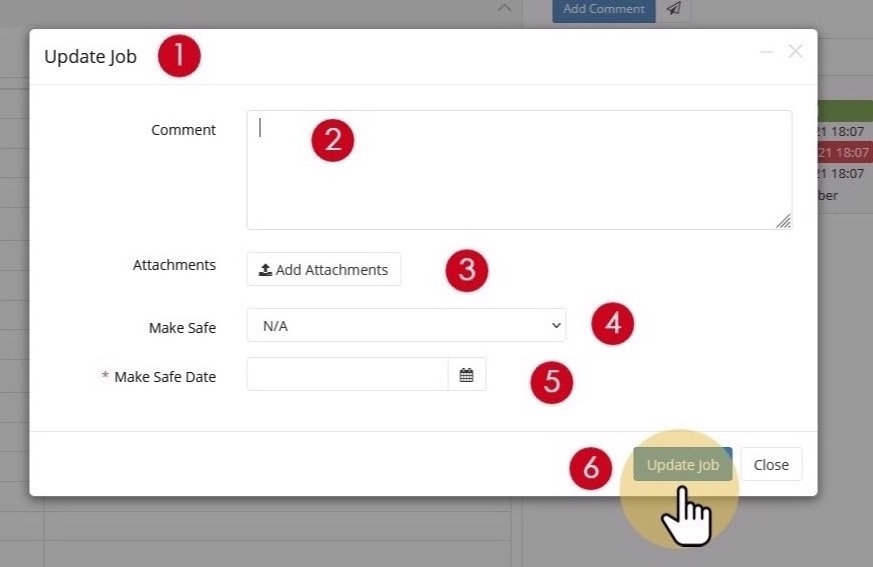
Update Job
Contractors can provide progress updates on jobs they are working on.
- Click Update Job - Click the Update Job button.
- Enter Comments - Add comments about the progress or status of the work.
- Add Attachments/Photos - Upload photos or documents showing progress.
- Confirm Make Safe (if applicable) - If the item needs to be made safe, confirm the status here.
- Enter Make Safe Date - If made safe, enter the date and time it was secured.
- Click Update Job - Click to save the update. A comment will be added to both the contractor section and the main job.
Delay / Hold Job
If work cannot proceed, contractors can place the job on hold with a reason.
- Click Hold - Click the Hold button to delay the job.
- Enter Comments - Explain why the job is being delayed.
- Add Attachments (Optional) - Upload any supporting documentation.
- Select Delay Reason - Choose the reason for the delay from the dropdown.
- Confirm Make Safe Status - Advise if the item has been made safe while on hold.
- Click Hold Job - Click to place the job on hold. Held jobs will appear in the Delayed Jobs report on the contractor's dashboard.
Hold Job Visibility: All hold actions will show in the comments for both the contractor job and the main service request, ensuring full visibility for the helpdesk team.

Complete Job
When work is finished, contractors complete the job and provide final details.
- Click Complete Job - Click the Complete Job button.
- Enter Completion Comments - Add comments describing the work completed.
- Add Attachments - Upload before/after photos or completion documentation.
- Enter Actual Completion Date - Enter the actual date and time the work was completed.
- Additional Contractor Required (Optional) - If another trade is needed to complete related work, advise here.
- Report Incidents - Advise if any incidents need to be reported.
- Report Near Misses - Advise if any near misses need to be reported.
- Click Complete Job - Click to mark the job as completed. The helpdesk will be notified and can close the main service request.
