Logging a Service Request
Learn how to create and submit service requests through Facilitease, including pre-job questions, contractor assignment, and attachments.
Overview
Service Requests (also referred to as Jobs) are the core of Facilitease's facilities management workflow. This guide walks you through the complete process of logging a new service request, from start to finish.
Service Request Form Tabs: The service request form contains four tabs that you can navigate between:
- Pre Job Questions - Initial screening questions
- Service Request Details - Core job information
- Contractors - Contractor assignment
- Attachments - Files, images, and related items
Starting from the Dashboard
You can initiate a new service request from multiple locations within Facilitease.

- Click "Add Service Request" - From the dashboard, click the Add Service Request button. This option is also available from virtually any Job/Service Request report page throughout the system.
Dashboard Quick Stats: The dashboard displays useful statistics at a glance including Jobs Due in 2 days, Jobs due today, My Divisions, New Jobs, My Customers, Open Jobs, and Jobs Closed This Month.
Select Location
After clicking Add Service Request, you need to specify where the job will be performed.

- Search for the Location - In the location selector, start typing the location name to filter the list. The search will match against Division, Customer, and Site names.
- Select the Location - Click on the correct location from the filtered results. The location will display in the format: Division / Customer / Site
- Confirm Selection - Click Add Service Request to proceed with the selected location.
Pre-Job Questions
The Pre Job Questions tab allows you to answer initial screening questions before entering the main service request details.
- Answer the Questions - Complete all required questions relating to your service request. Fields marked with an asterisk (*) are mandatory.
Configuration Note: The fields and questions displayed on this tab will differ depending on your organisation's Facilitease configuration. Your administrator can customise these questions through the Entity Questions feature.
Common Pre-Job Question Fields
| Field | Description |
|---|---|
| After Hours | Select Yes if you are logging this job after hours |
| HSSE Risk? | Indicate if there are health, safety, security, or environment risks |
| Security Risk? | Flag any security concerns related to the job |
| Is this the result of an accident/incident? | Indicate if the request relates to an accident or incident |
| Is this affecting your day to day operations? | Helps prioritise business-critical issues |
| Location Contact Name | Name of the on-site contact for this job |
| Location Contact Number | Phone number for the on-site contact |
| Contact Email | Email address for the on-site contact |
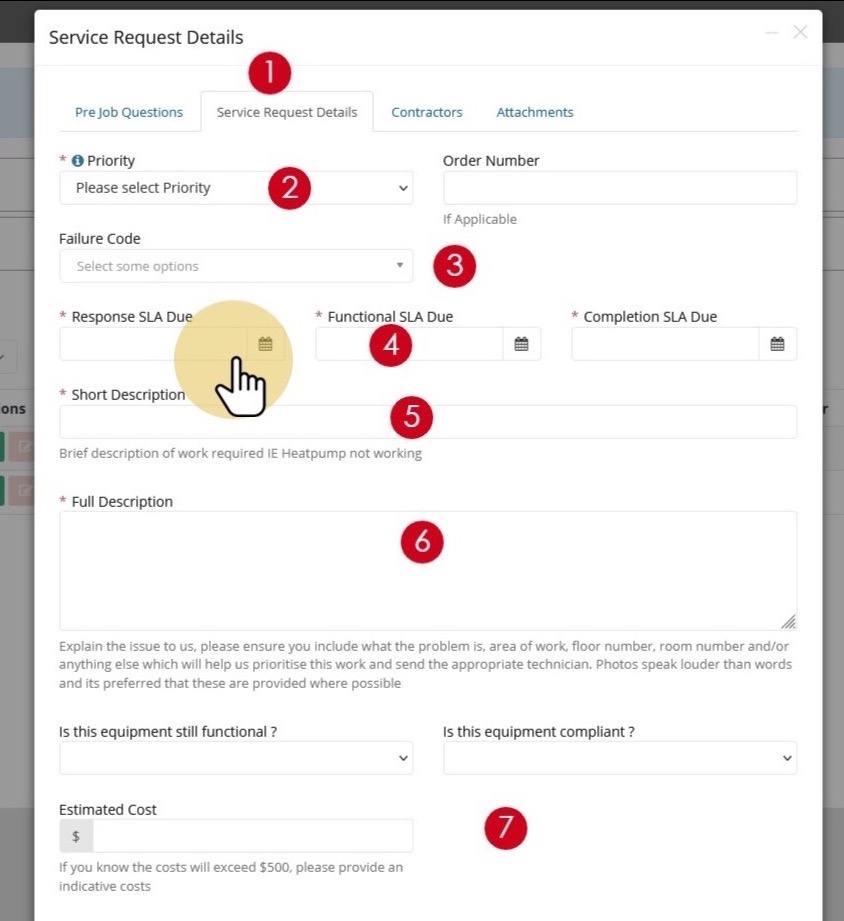
Service Request Details
The Service Request Details tab is where you enter the core information about the job.
- Select the Service Request Details Tab - Click on the Service Request Details tab at the top of the form.
- Select Job Priority - Choose the appropriate priority level:
- Specified Date - Requires you to enter specific service dates
- P1, P2, P3, etc. - Uses the configured SLAs for the customer for that priority level
- Select Failure Code (Optional) - If applicable, select a failure code that categorises the type of issue being reported.
- Enter Dates (if Specified Date selected) - If you selected "Specified Date" as the priority, enter the required Response SLA Due, Functional SLA Due, and Completion SLA Due dates.
- Enter Short Description - Provide a brief description of the work required (e.g., "Heatpump not working"). This description will also pre-populate the contractor job description.
- Enter Full Description - Provide detailed information about the issue. Include what the problem is, area of work / floor number / room number, and any other relevant details.
- Complete Additional Fields - Fill in any other applicable fields such as Order Number, Is this equipment still functional?, Is this equipment compliant?, and Estimated Cost.
Photos Help! Please ensure you include what the problem is, area of work, floor number, room number and/or anything else which will help us prioritise this work and send the appropriate technician. Photos speak louder than words and are preferred where possible.
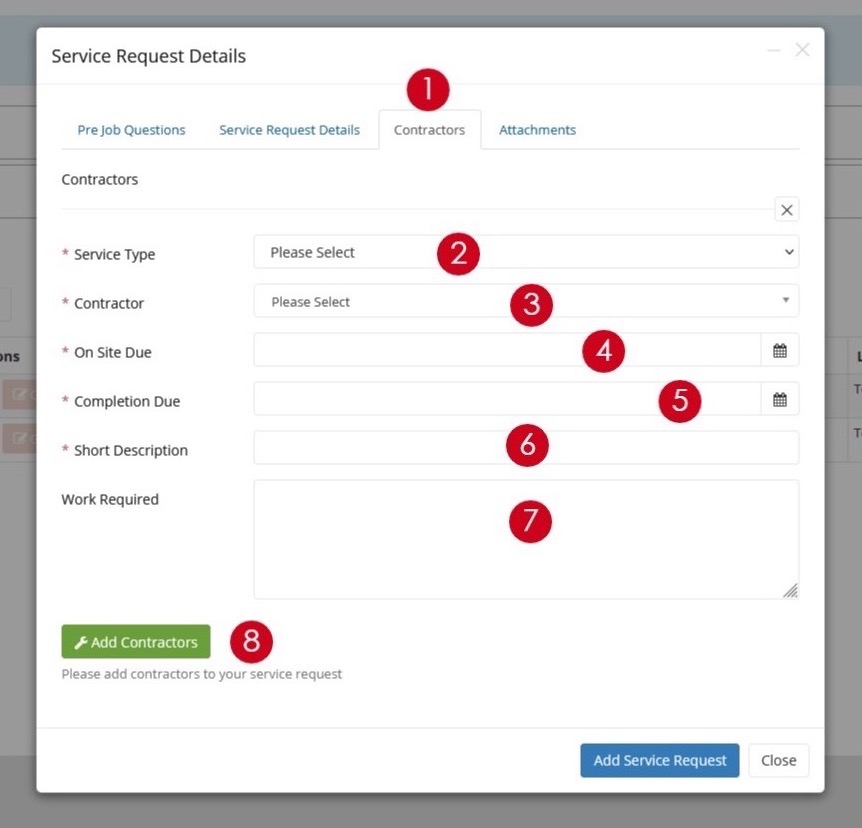
Contractors Tab
The Contractors tab allows you to assign one or more contractors to the service request.
- Select Contractors Tab - Click on the Contractors tab at the top of the form.
- Select Service Type - Choose the service type or trade for the customer (e.g., Electrical, Plumbing, HVAC).
- Select Contractor - Choose a contractor from the list. The list is filtered based on approved contractors for the customer and contractors whose service types match the selected trade. You can override this by clicking Show All Contractors.
- Set On Site Due Date - Select the date and time you require the contractor to be on site.
- Set Completion Due Date - Select the date and time by which the work should be completed.
- Enter Work Description - Provide a short description of work and more details in the Work Required field.
- Add More Contractors (Optional) - Click Add Contractors to assign additional contractors if multiple trades are needed.
Unassigned Jobs: If no contractors are assigned to the job, the job status will remain "Unassigned". You can assign contractors later from the dashboard.
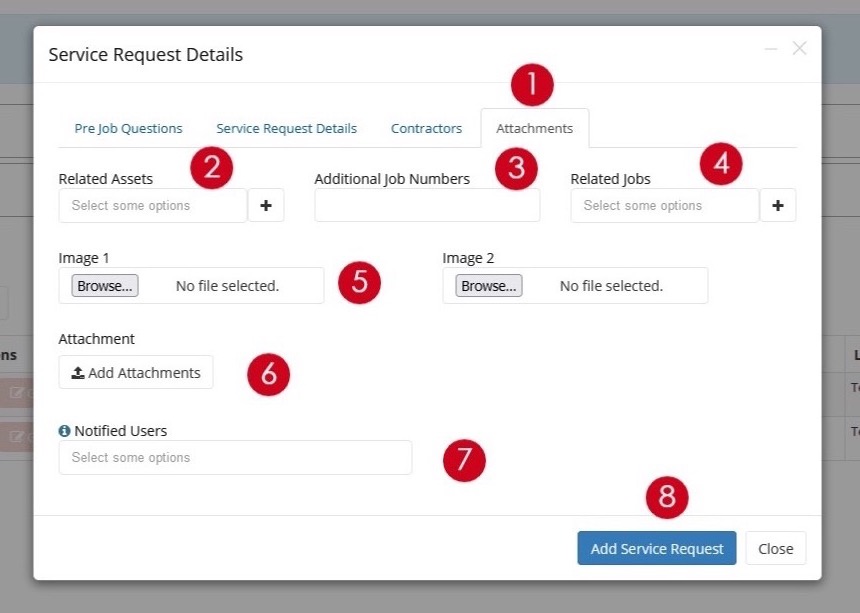
Attachments Tab
The Attachments tab allows you to add related assets, images, files, and configure notifications.
- Select the Attachments Tab - Click on the Attachments tab at the top of the form.
- Select Related Assets - Choose any assets that are related to this job.
- Add External Job Numbers (Optional) - Enter any job or reference numbers from external systems.
- Link Related Jobs (Optional) - Select related jobs from your Facilitease instance to link to this service request.
- Attach Images - Upload up to two images directly on the form. If you're on a mobile device, you can take photos at this point.
- Add File Attachments - Upload supporting documents. Accepted formats: PDF, JPG, JPEG, PNG, DOC.
- Add Notified Users (Optional) - Select system users who should receive notifications about this job.
- Submit the Service Request - Click the Add Service Request button to log the request.
Attachment Fields Summary
| Field | Description |
|---|---|
| Related Assets | Link assets from the site to this service request |
| Additional Job Numbers | Reference numbers from external systems |
| Related Jobs | Link to other service requests in Facilitease |
| Image 1 & 2 | Photo uploads (can take photos on mobile) |
| Attachments | Supporting documents (PDF, images, Word docs) |
| Notified Users | Additional users to receive job notifications |
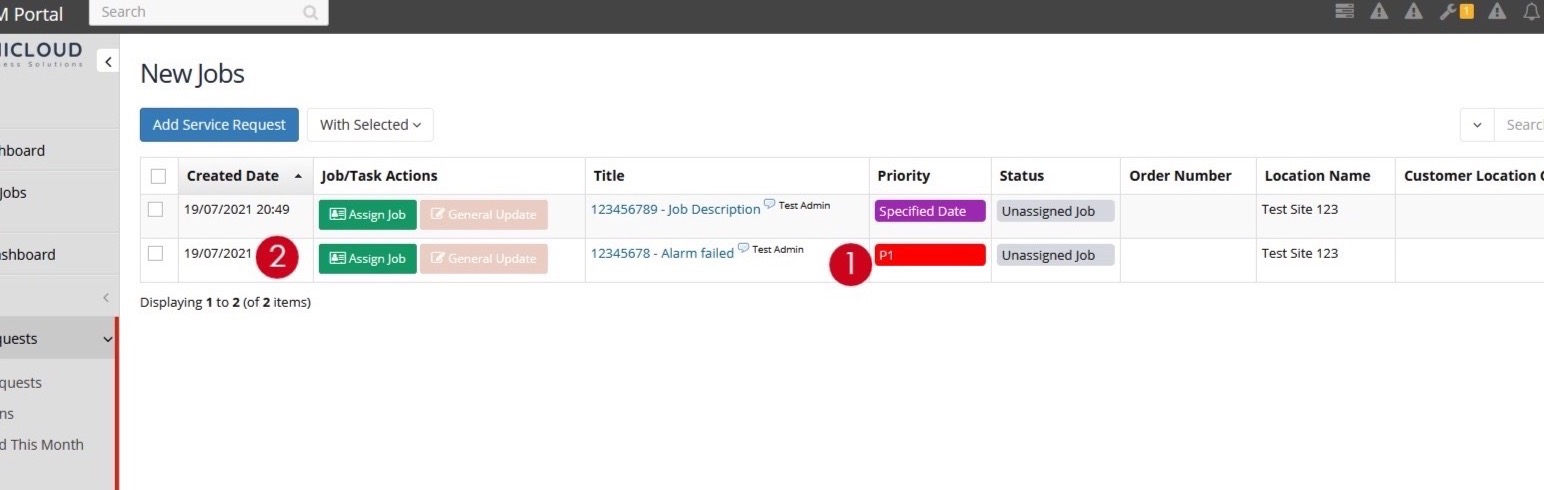
Viewing Your Request
After submitting, your service request will appear on the dashboard and can be managed from there.
- View on Dashboard - Your new Service Request / Job will now show on the dashboard in the "New Jobs" section.
- Assign Contractor (if not done) - If you haven't assigned a contractor yet, click the Assign Job button next to the job to do so.
Quick Actions: From the dashboard, you can use the action buttons next to each job to Assign Job, add a General Update, or click on the job title to view full details.