User Management by External Parties
Learn how Customer Administrators, Site Managers, and Contractor Administrators can create and manage users within their own organisations.
Contents
Overview
FacilitEase allows external parties to manage their own users, reducing administrative burden on system administrators. Three types of administrators can create and manage users:
Customer Administrator
Can create and manage users at all levels within their customer organisation.
- Customer Admin
- Customer Group Manager
- Customer Project Manager
- Site Manager
- Site Team Member
Site Manager
Can add and manage users only within their assigned sites.
- Site Manager
- Site Team Member
Contractor Administrator
Can create and manage users within their own contractor company.
- Contractor Administrator
- Contractor Technician
Delegated Administration: This delegated user management allows organisations to maintain control over their own users while reducing the workload on central system administrators.
User Types & Permissions
Understanding the hierarchy and access levels of each user type helps you assign the correct roles.
Customer Organisation Hierarchy
Contractor Organisation Hierarchy
Access Levels Summary
| User Type | Scope | Can Manage Users | Access Level |
|---|---|---|---|
| Customer Admin | Entire customer portfolio | Yes - all customer user types | Full access |
| Customer Group Manager | Assigned site groups | No | Regional/group access |
| Customer Project Manager | Customer sites, projects | No | Project-focused |
| Site Manager | Assigned sites only | Yes - site level users | Site-specific |
| Site Team Member | Assigned sites only | No | View only |
| Contractor Admin | Contractor company | Yes - contractor users | Full contractor access |
| Contractor Technician | Assigned jobs only | No | Individual jobs |
Customer Administrator - Adding a New User
As a Customer Administrator, you can create users at any level within your customer organisation.

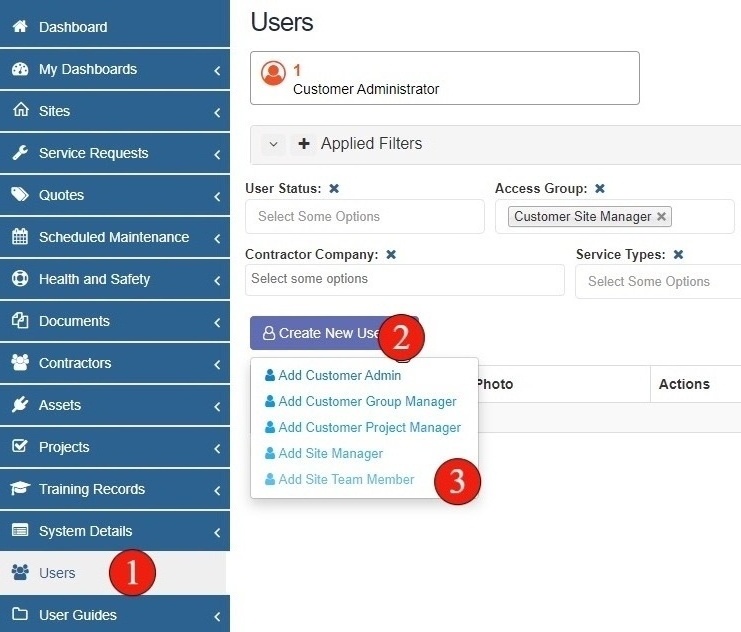
- Select Users from the Main Menu - Navigate to the Users option in the main navigation menu on the left side of the screen.
- Hover on Create New User - Click or hover over the Create New User button to reveal the user type options.
- Select User Type - Choose which type of user you would like to create from the dropdown menu.
Available User Types: As a Customer Administrator, you can create: Customer Admin, Customer Group Manager, Customer Project Manager, Site Manager, and Site Team Member.
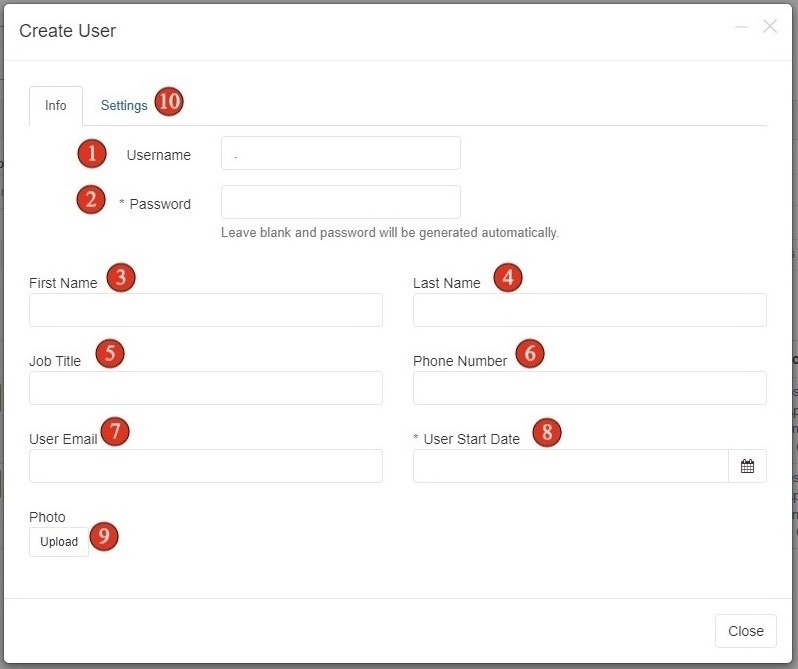
New User Setup
When creating any new user, you'll need to complete the user information form on the Info tab first.
- Choose the Username - Enter a unique username for the new user. This will be used for login.
- Set Password (Optional) - Leave the password blank for automatic generation, or set a specific password for the user.
- Enter User Details - Complete the user's first name, last name, job title, and phone number.
- Enter Email Address - Enter the user's email address. This will receive the welcome email with login details.
- Set Start Date - Select the date the user started or will start working.
- Upload Photo (Optional) - Add a photo of the user for identification purposes.
- Select Settings Tab - Click the Settings tab to configure user-specific settings based on their user type.
Welcome Email: The email address you enter will automatically receive a welcome email containing login details and instructions for accessing FacilitEase.
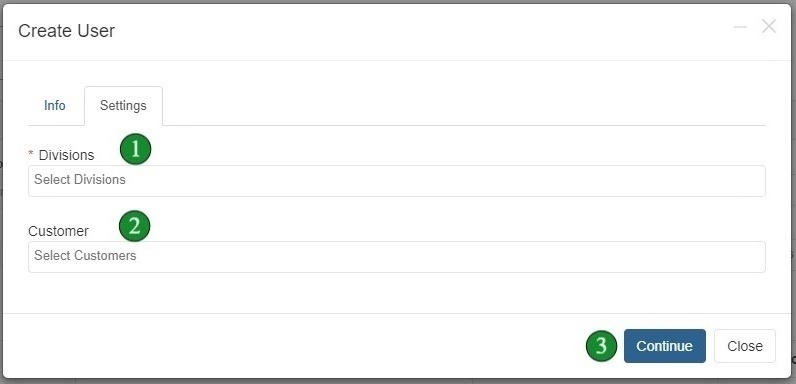
Customer Admin & Customer Project Manager Settings
After completing the new user setup, configure the following settings for Customer Administrator and Customer Project Manager users.
- Select Relevant Division - Choose the division(s) this user should have access to.
- Select Relevant Customer - Choose which customer organisation this user belongs to.
- Click Continue - Click Continue to create the user with these settings.
User Type Descriptions
Customer Administrator
A Customer Administrator will have access to everything within the system relative to that specified customer, including the ability to manage users.
Typical Use: Higher level customer user who needs access and visibility over an entire customer portfolio.
Customer Project Manager
A Customer Project Manager will have visibility of the customer's sites, quotes, scheduled maintenance, assets, and projects.
Typical Use: Users who primarily operate in the projects area of the system.
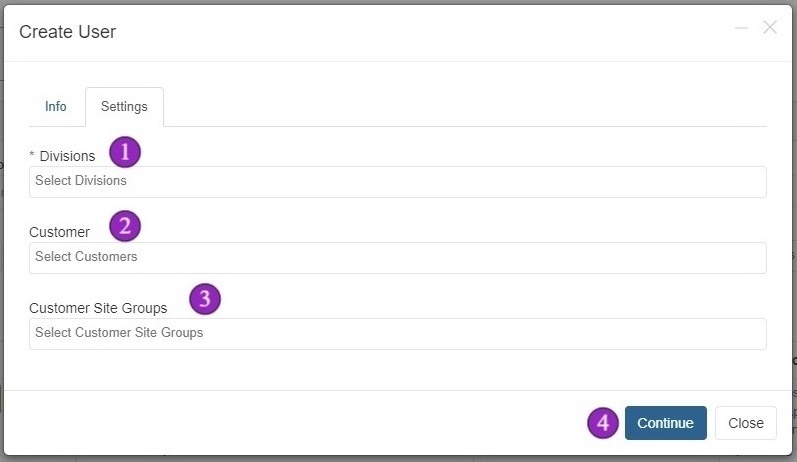
Customer Group Manager Settings
Customer Group Managers have access limited to specific site groups within a customer organisation.

- Select Relevant Division - Choose the division(s) for this user.
- Select Relevant Customer - Choose the customer organisation.
- Select Customer Site Group - Choose the specific site group(s) this user should have access to.
- Click Continue - Click Continue to create the user.
Customer Group Manager Use Case: This user type is ideal for regional managers. For example, if you have a customer manager who only looks after sites in the Northern region, you can:
- Set up a Customer Site Group called "Northern"
- Apply that group to all relevant sites
- Create a Customer Group Manager with access to only the Northern group
This user will have access to only these sites and everything below them (quotes, service requests, scheduled maintenance, contractor jobs, etc.).
Site Manager Settings
Site Managers have access to one or many specific sites and can add additional Site Team members within their sites.
- Select Relevant Customer - Choose the customer organisation.
- Select Customer Site Group (If Applicable) - Optionally select a site group to filter available sites.
- Select Relevant Sites - Choose the specific site(s) this user will manage.
- Click Continue - Click Continue to create the Site Manager.
Site Manager Capabilities: A Site Manager will have access to everything relative to their assigned site(s), including:
- Service requests
- Assets
- Scheduled maintenance
- Contractor jobs
Important: A Site Manager can also add additional Site Team members to their sites.
Site Team Member Settings
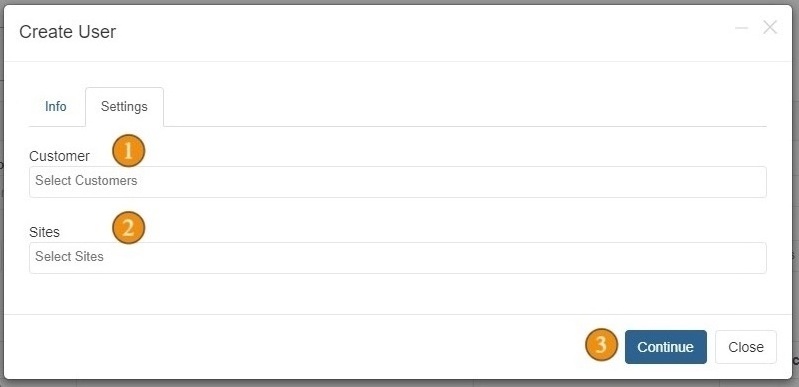
Site Team Members have view-only access to their assigned sites.

- Select Relevant Customer - Choose the customer organisation.
- Select Relevant Sites - Choose the site(s) this team member should have access to.
- Click Continue - Click Continue to create the Site Team Member.
View-Only Access: Site Team Members have view-only access to their assigned sites. They can view service requests and contractor jobs but cannot make changes or create new records.
Contractor Administrator - Adding a New User
As a Contractor Administrator, you can create users within your own contractor company.
- Select Users from the Main Menu - Navigate to the Users option in the main navigation menu.
- Hover on Create New User - Click or hover over the Create New User button.
- Select User Type - Choose between Add Contractor Admin or Add Technician.
Complete the same user information form as described in the New User Setup section, then proceed to the Settings tab.
Contractor Admin Settings
Configure the following settings for Contractor Administrator and Contractor Technician users.
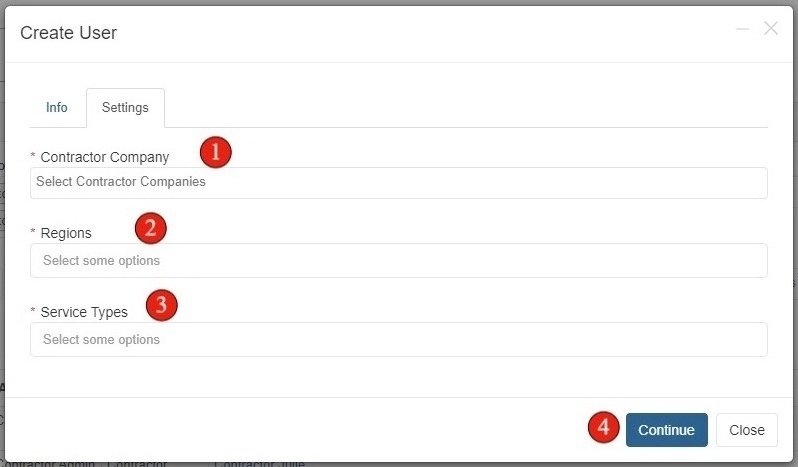
- Select Relevant Contractor Company - Choose your contractor company from the list.
- Select Relevant Region(s) - Choose the region(s) this user will operate in.
- Select Relevant Service Type(s) - Choose the service types this user will handle.
- Click Continue - Click Continue to create the contractor user.
Contractor User Type Comparison
| Feature | Contractor Admin | Contractor Technician |
|---|---|---|
| View Requests | All assigned to company | Only assigned to individual |
| View Quotes | All assigned to company | Only assigned to individual |
| View Assets | All assigned to company | Only assigned to individual |
| View Scheduled Maintenance | All assigned to company | Only assigned to individual |
| View Contractor Jobs | All assigned to company | Only assigned to individual |
| Manage Users | Yes | No |
Key Difference:
Contractor Admin: Has visibility and access over all requests, quotes, assets, scheduled maintenance, and contractor jobs assigned to the contractor company.
Technician: Has similar access but will only see records that have been assigned to them as an individual.