Entity Questions Creation and Set Up
Create custom questions for various forms and configure answer categories and options throughout the system.
Contents
Overview
Entity Questions allows you to create your own custom questions and have them visible in various areas within the system. Each question can be made specific to your:
You can configure answer types (radio box or dropdown list) and for common answers like Yes/No, you can set up Answer Categories and Options, enabling you to reuse those answers across various questions.
Conditional Text Fields: There is also the ability to show an additional text box based on the answer selected. For example, if a question is answered "No", you can show an additional text box allowing the user to provide more detail where needed.
Supported Forms
Entity questions can appear on the following forms within FacilitEase:
| Module | Form Location | Description |
|---|---|---|
| Insurance Claims | Claim Creation Form | Questions appear when creating a new insurance claim |
| Service Requests | Pre-Job Questions | Questions appear before job assignment or commencement |
| Tech Activity | Sign In Form | Questions appear when technicians sign in to a site |
| HSE Periodic Reports | Report Creation Form | Questions appear when creating HSE reports |
Adding a New Entity Question - Info Setup
Follow these steps to create a new entity question:
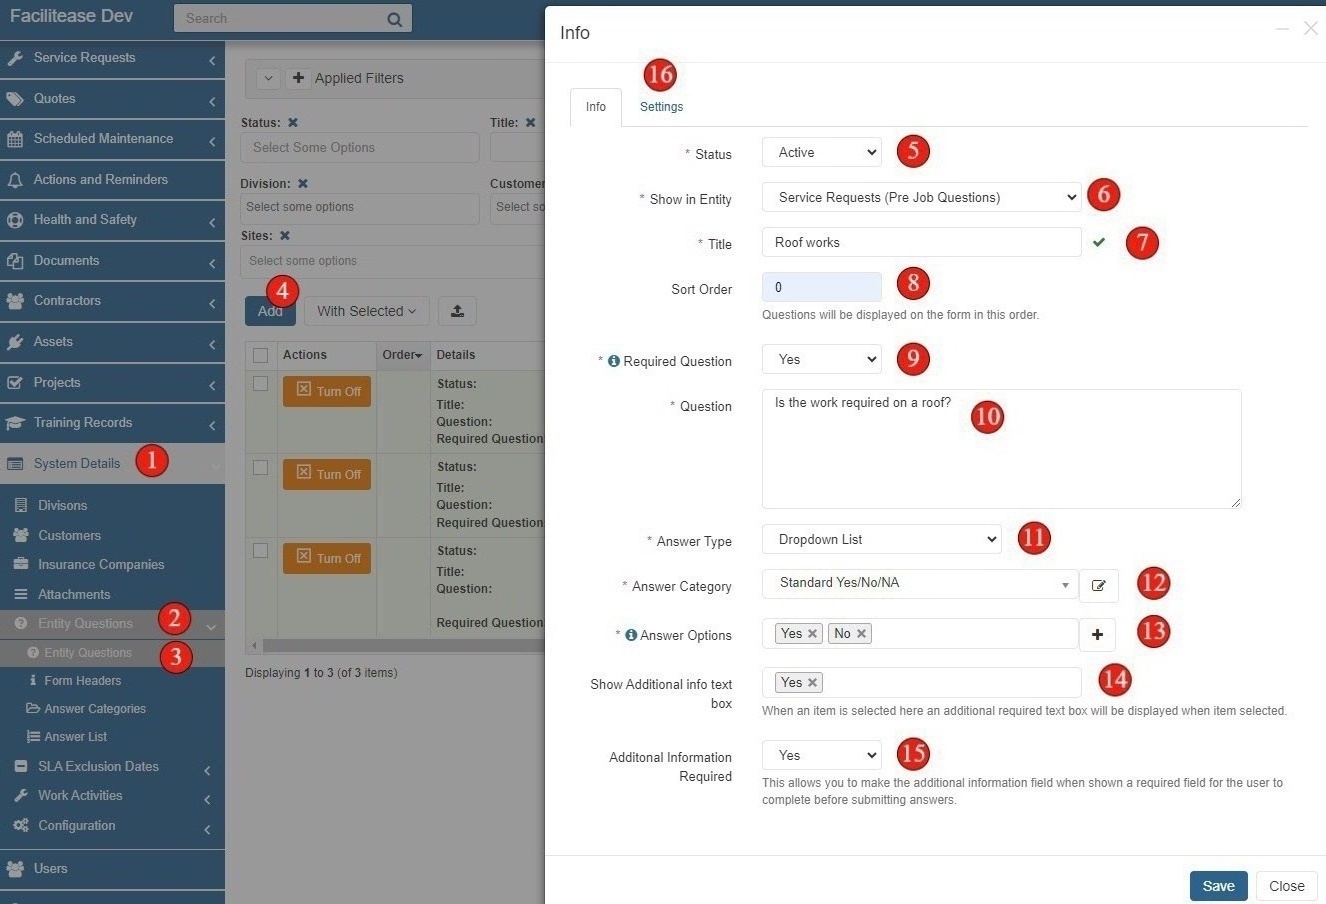
- Navigate to Entity Questions - Go to System Details in the menu, then select Entity Questions, then select Entity Questions again.
- Click Add - Click the Add button to create a new entity question.
- Set the Status - Choose your Status. You can either make this Active straight away or make it Inactive until you are ready for the question to be live.
- Choose the Entity and Form - Select which Entity and form you want this question to appear on. For example, selecting "Service Requests" will make the question appear on the Pre-Job Questions form.
- Enter a Title - Give your question a Title. Note that this is not the question itself - it's an internal identifier.
- Set Sort Order - Choose a Sort Order. This is helpful if you are setting up many questions to appear on the same form - you can choose which order they appear by giving them numbers starting from 0 (top).
- Set Required Status - Select Yes if this question needs to be required/mandatory, otherwise select No.
- Write the Question - Write the actual Question as you want it to appear on the form (e.g., "Is the work required on a roof?").
- Select Answer Type - Select your Answer Type. Options available are:
- Radio Box - Tick box selection
- Dropdown List - Select from dropdown menu
- Input Field - Free text single line
- Text Area - Free text multi-line
- Select Answer Category - Select an Answer Category. You can choose from an existing one you have already created or create a new one directly from this screen.
- Choose Answer Options - Based on the category selected, the relevant answer options will appear. Choose which ones from that category you want to use for this question (e.g., Yes, No).
- Configure Additional Text Box (Optional) - If you need an additional text box to appear based on a certain answer, configure it here. For example, show a text box when the user selects "Yes".
- Set Additional Information Required (Optional) - If using the additional text box, specify whether the additional information is required/mandatory or not.
- Proceed to Settings - Click on the Settings tab at the top of the form to configure where this question appears.
Note: If you select Input Field or Text Area, the answer category options will hide as they are only relevant when using dropdown lists or radio boxes.
Question Form Fields Reference
| Field | Description | Required |
|---|---|---|
| Status | Active or Inactive - controls whether question is live | Yes |
| Show in Entity | Which module/form the question appears on | Yes |
| Title | Internal reference title (not shown to users) | Yes |
| Sort Order | Display order on form (0 = top) | No |
| Required Question | Whether answer is mandatory | Yes |
| Question | The actual question text shown to users | Yes |
| Answer Type | Radio Box, Dropdown List, Input Field, or Text Area | Yes |
| Answer Category | Category containing answer options (for Radio/Dropdown) | Conditional |
| Answer Options | Specific answers to include from category | Conditional |
| Show Additional Info Text Box | Which answer triggers additional text field | No |
| Additional Information Required | Whether additional text is mandatory when shown | No |
Settings Configuration
The Settings tab allows you to control exactly where your entity question appears. You can restrict the question to specific entities or show it for all.
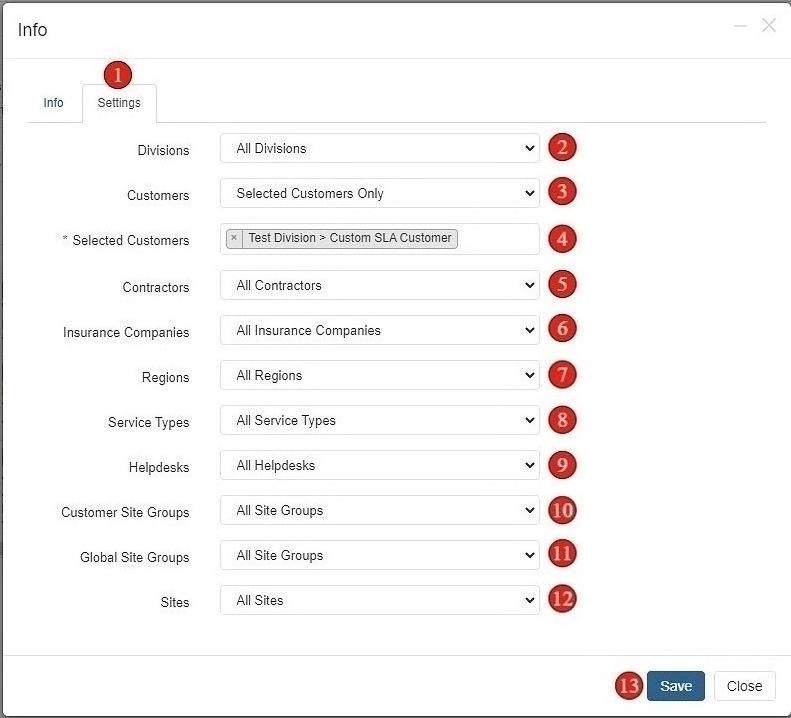
- Go to Settings Tab - Click on the Settings tab at the top of the form.
- Configure Division Settings - Select whether to show for All Divisions or specific divisions only.
- Configure Customer Settings - Select whether to show for All Customers or specific customers only. If selecting specific customers, choose which ones from the list.
- Configure Contractor Settings - Select whether to show for All Contractors or specific contractors only.
- Configure Insurance Company Settings - Select whether to show for All Insurance Companies or specific companies only.
- Configure Region Settings - Select whether to show for All Regions or specific regions only.
- Configure Service Type Settings - Select whether to show for All Service Types or specific service types only.
- Configure Helpdesk Settings - Select whether to show for All Helpdesks or specific helpdesks only.
- Configure Site Group Settings - Select whether to show for All Customer Site Groups and All Global Site Groups or specific groups only.
- Configure Site Settings - Select whether to show for All Sites or specific sites only.
- Save the Question - Click Save to save your entity question with all configured settings.
Available Settings Filters
| Setting | Options | Description |
|---|---|---|
| Divisions | All Divisions / Selected Only | Restrict question to specific business divisions |
| Customers | All Customers / Selected Only | Restrict question to specific customers |
| Contractors | All Contractors / Selected Only | Restrict question to jobs assigned to specific contractors |
| Insurance Companies | All Insurance Companies / Selected Only | Restrict question to claims with specific insurance companies |
| Regions | All Regions / Selected Only | Restrict question to sites in specific regions |
| Service Types | All Service Types / Selected Only | Restrict question to specific service request types |
| Helpdesks | All Helpdesks / Selected Only | Restrict question to specific helpdesks |
| Customer Site Groups | All Site Groups / Selected Only | Restrict question to customer-specific site groups |
| Global Site Groups | All Site Groups / Selected Only | Restrict question to global site groups |
| Sites | All Sites / Selected Only | Restrict question to specific sites |
Using Multiple Filters: You can combine multiple filters to create highly targeted questions. For example, you might create a question that only appears for a specific customer's sites in a particular region when the service type is "Electrical".
Adding an Answer Category
Answer Categories group related answer options together. For example, a "Generic Yes/No" category would contain "Yes" and "No" options that can be reused across multiple questions.
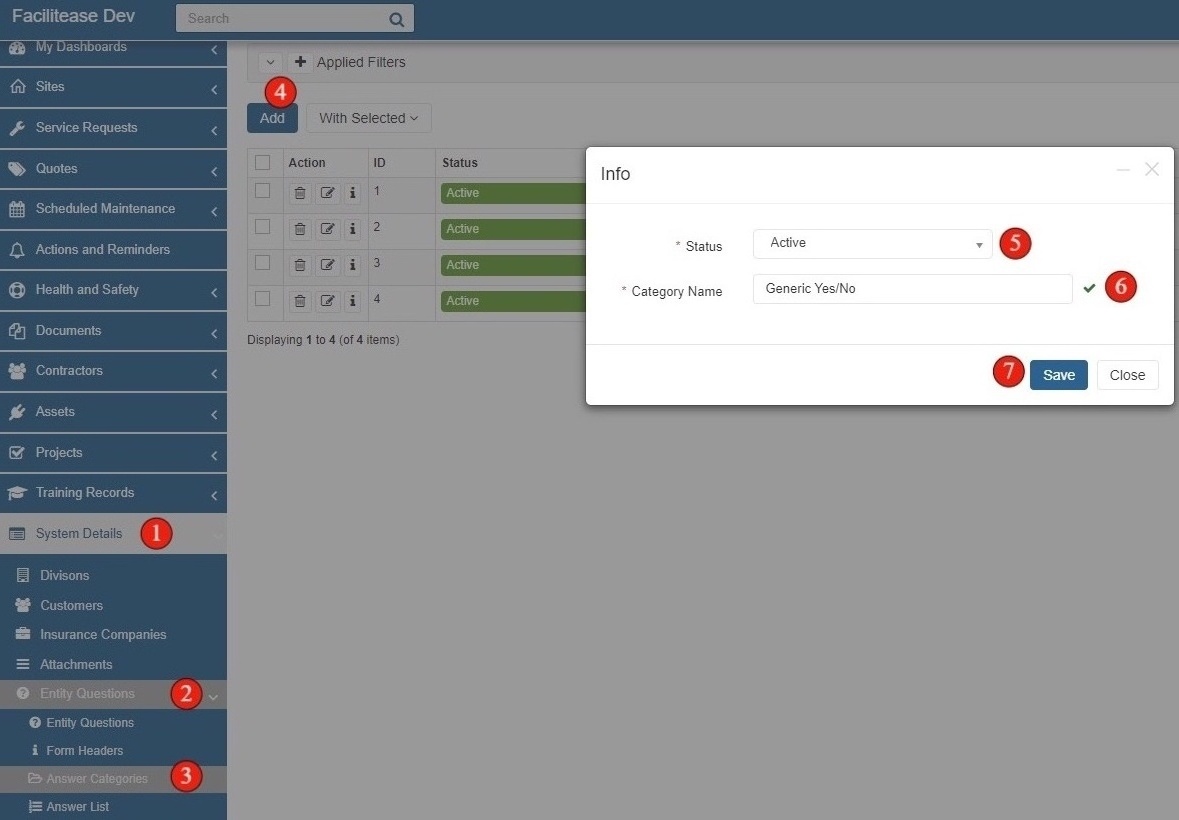
- Navigate to Answer Categories - Go to System Details in the menu, then select Entity Questions, then select Answer Categories.
- Click Add - Click the Add button to create a new answer category.
- Set the Status - Select your Status (Active or Inactive).
- Enter Category Name - Give your Category a Name. Keep in mind that when you create Answer Options, you will need to specify which category they belong to, so use a descriptive name.
- Save - Click Save to create the category.
Example Answer Categories
Standard Yes/No
- Yes
- No
Yes/No/NA
- Yes
- No
- N/A
Priority Levels
- Level 1
- Level 2
- Level 3
- Level 4
Compliance Status
- Compliant
- Non-Compliant
- Pending Review
Adding Answer Options
Answer Options are the individual choices within an Answer Category. Each option must be created separately and assigned to a category.
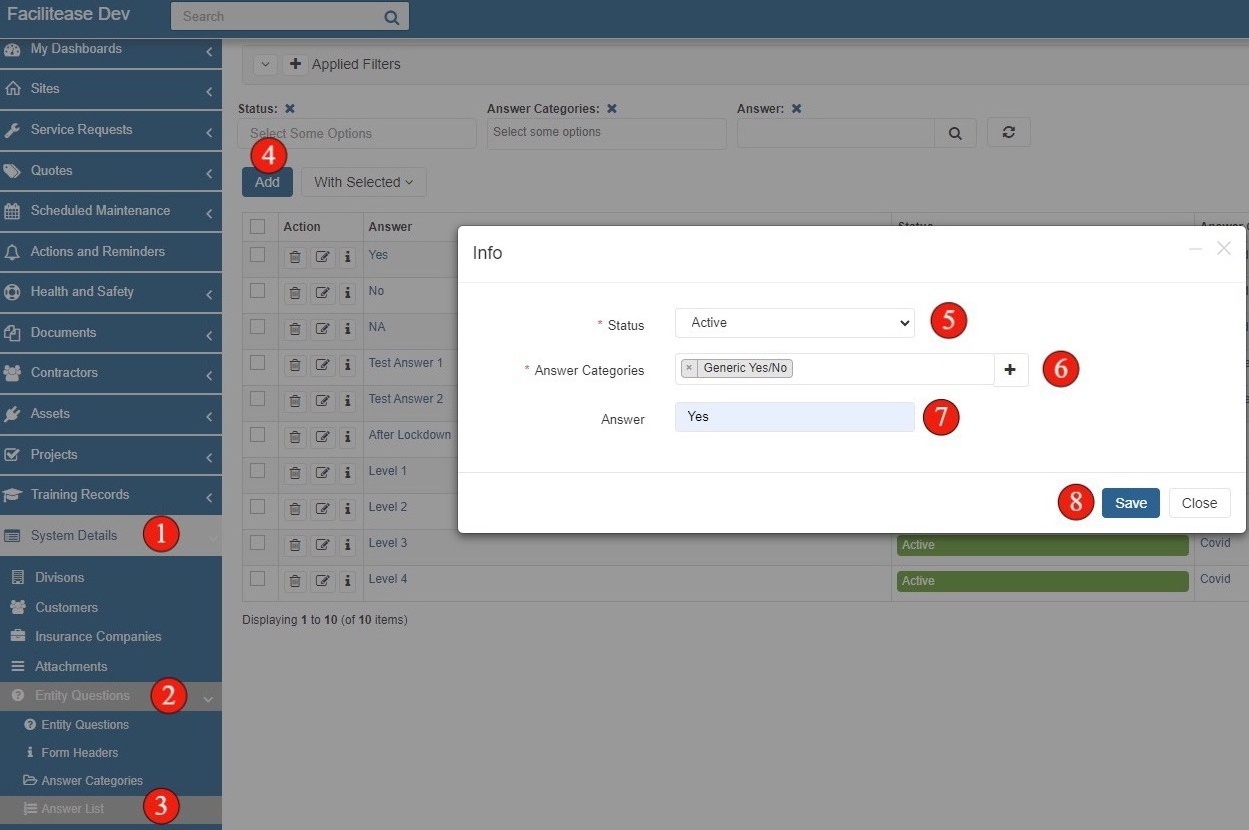
- Navigate to Answer List - Go to System Details in the menu, then select Entity Questions, then select Answer List.
- Click Add - Click the Add button to create a new answer option.
- Set the Status - Select your Status (Active or Inactive).
- Choose the Category - Select which Answer Category this answer belongs to from the dropdown.
- Enter the Answer - Add the Answer text that will be displayed to users.
- Save - Click Save to create the answer option.
Creating Multiple Options: If you need to create multiple options for the same category, repeat the above steps and only change the Answer itself. For example, a "Generic Yes/No" category requires both a "Yes" answer and a "No" answer - you would create each one separately.
Navigation Summary
| Task | Navigation Path |
|---|---|
| Manage Entity Questions | System Details → Entity Questions → Entity Questions |
| Manage Form Headers | System Details → Entity Questions → Form Headers |
| Manage Answer Categories | System Details → Entity Questions → Answer Categories |
| Manage Answer Options | System Details → Entity Questions → Answer List |