Insurance Claim Management
Create, manage, and track insurance claims directly from service requests. Collaborate with insurance companies, contractors, and site managers through a streamlined workflow.
Overview
Managing Insurance Claims is now integrated into the Facilities Maintenance System. An Insurance claim can be created directly from a Service Request, linking them together.

From here you can:
- Involve the relevant Insurance Company
- Request additional information from site and/or the Contractor
- Complete and submit your finalized claim to the Insurance Company
The current workflow allows interaction between:
- Site Managers - Can provide incident details and additional information
- Contractors - Can submit repair details and documentation
- Insurance Companies - Can acknowledge, request info, and approve/decline claims
- Helpdesk / System Administrators - Can manage the entire claims process
Insurance Workflow
The workflow diagram shows how Insurance Claims work within the system:
Color Key:
- Green - Core milestones of the claim
- Blue - Optional: Request info from contractor/site manager
Workflow Scenarios
Scenario #1: Full Collaboration
Insurance Company, Site Manager, and Contractors are existing users in the system.
- Process starts from an existing Service Request linking the two together
- Insurance company receives initial details and acknowledges the claim, assigning a file number
- Additional information can be requested directly from site and/or contractor
- All details collated and submitted back to Insurance company
- Claim is approved and finalization is worked through
Scenario #2: Internal Management
Internal user manages all milestones.
- Process starts from an existing Service Request
- Specific user(s) managing the process manually add milestone dates
- All relevant information and statuses updated as and when required
Scenario #3: Hybrid Approach
Combination of Scenarios #1 and #2.
- Some users interact in the system while others provide information externally
- You decide who interacts and at what step in the process
- Your business process determines the workflow
Creating an Insurance Claim
In the Facilities Maintenance industry, there are very few instances where you would have an Insurance Claim without a related job. For this reason, claims are created directly from the Service Request.
Who Can Create: This process can be started by: Customer Site Manager (if allowed in configuration), Helpdesk users, Contact Centre users, and System Administrators.
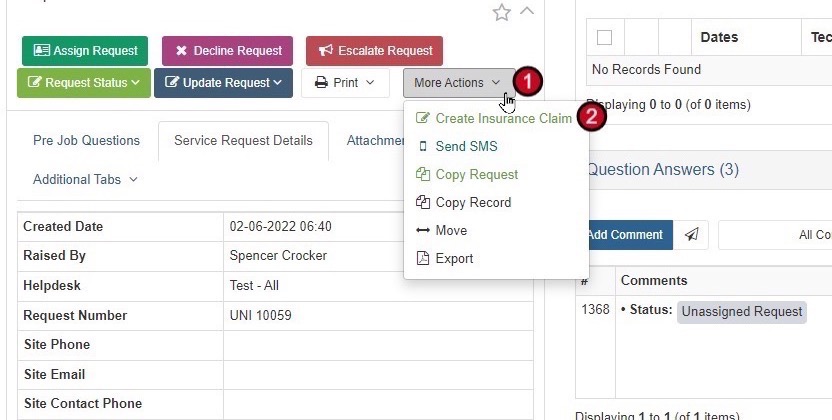
Step 1: Initiate the Claim
- Open the Service Request - Navigate to the Service Request related to the insurance claim
- Access More Actions - Hover over More Actions
- Create Insurance Claim - Click on Create Insurance Claim
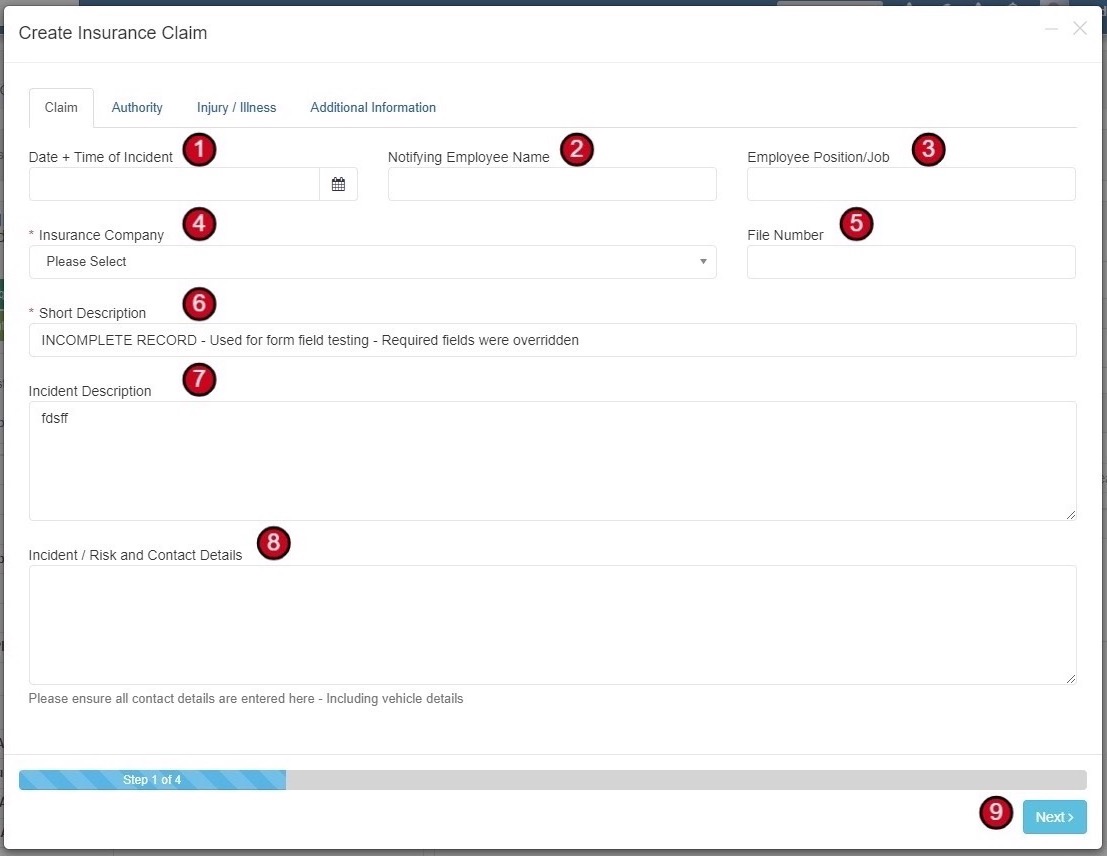
Step 2: Claim Details (Page 1)
Add all the initial incident/insurance claim details:
- Date + Time of Incident/Event
- Notifying Employee Name
- Employee Position/Job
- Insurance Company - Select from existing or add new
- File Number - If you have this already
- Short Description - Defaults to Service Request name
- Incident Description - Detailed description of what happened
- Incident/Risk and Contact Details - Including vehicle details if relevant
- Click Next
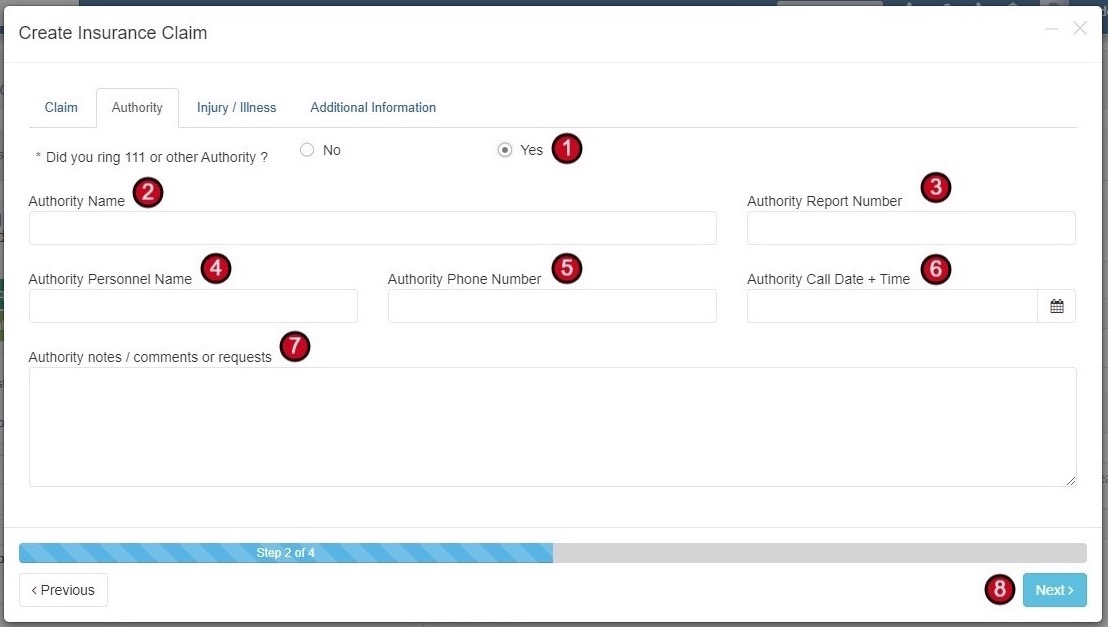
Step 3: Authority Details (Page 2)
- Did you ring 111 or other Authority? - Answer Yes/No
- Authority Name - Person or company name
- Authority Report Number - Reference from authority
- Authority Personnel Name - Contact name
- Authority Phone Number
- Authority Call Date + Time
- Authority Notes
- Click Next

Step 4: Injury/Illness Details (Page 3)
- Is there CCTV footage? - Yes/No
- Was there an injury or illness as a result? - Yes/No
- Injury/Illness Type
- Injury Source/Nature
- Hospitalised overnight? - Yes/No
- Body Part - Name the body part(s) injured
- Did employee die? - Yes/No
- Date of Death - If applicable
- Additional Injury Information
- Click Next
Dynamic Fields: Some questions will show and hide depending on answers to previous questions.
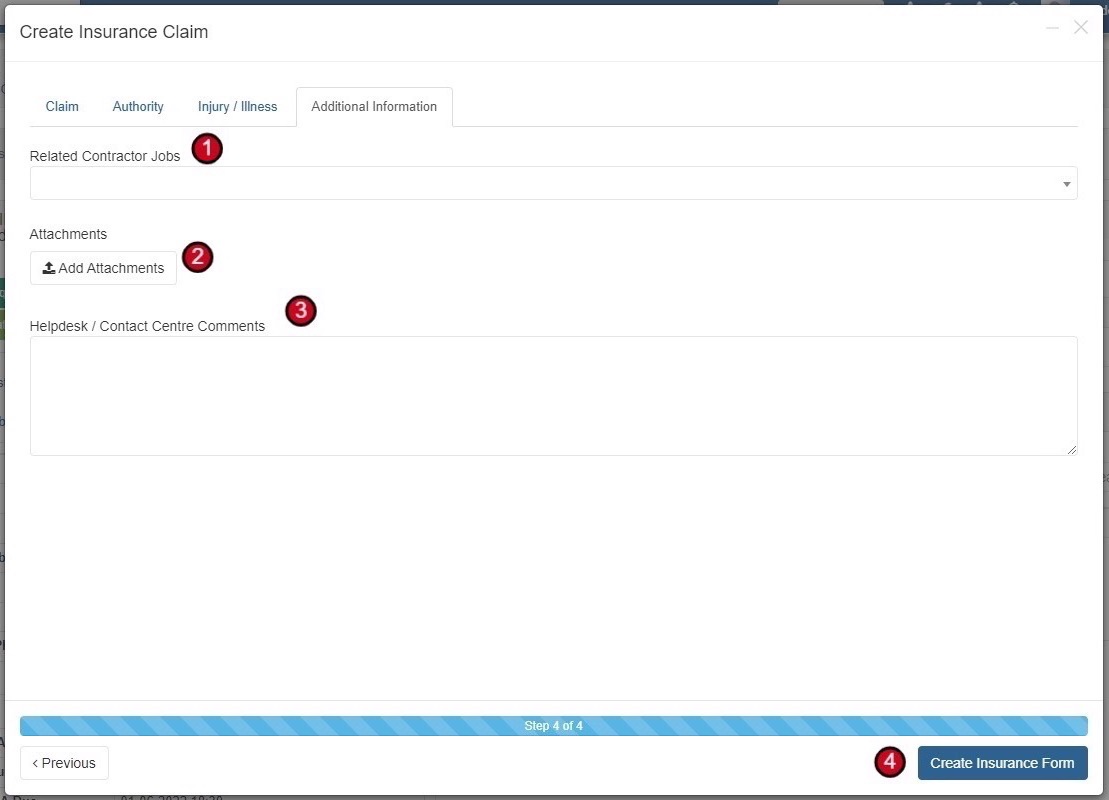
Step 5: Additional Information (Page 4)
- Related Contractor Jobs - Add if there are multiple jobs related to the claim
- Attachments - Add any relevant documents, photos, etc.
- Helpdesk/Contact Centre Comments
- Click Create Insurance Form
Viewing Your Claims
Once created, the Insurance Form is linked to the Service Request and can be accessed from multiple locations.
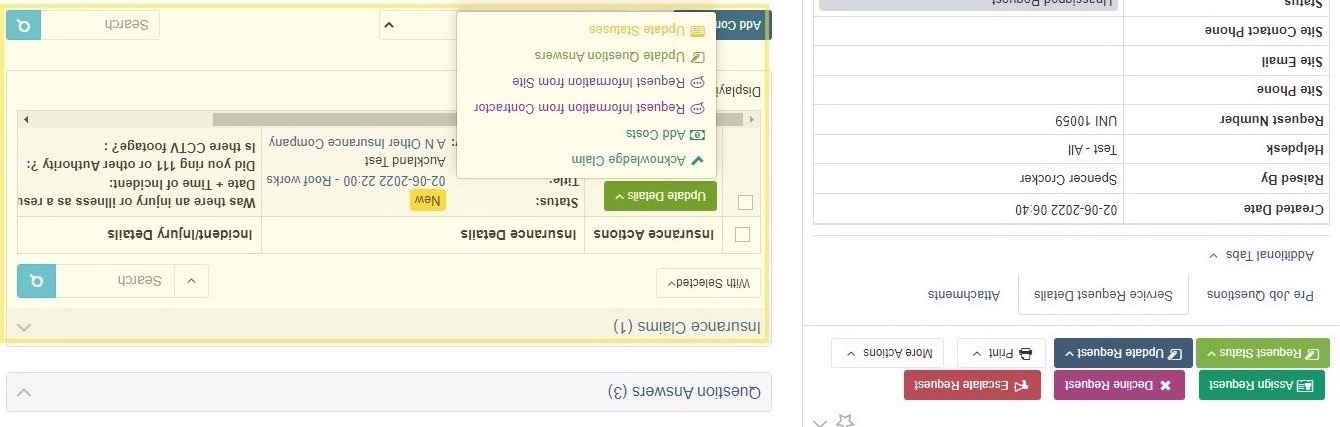
View from Service Request
The Insurance Claims section will appear in the Service Request with the Update Details button for various actions.
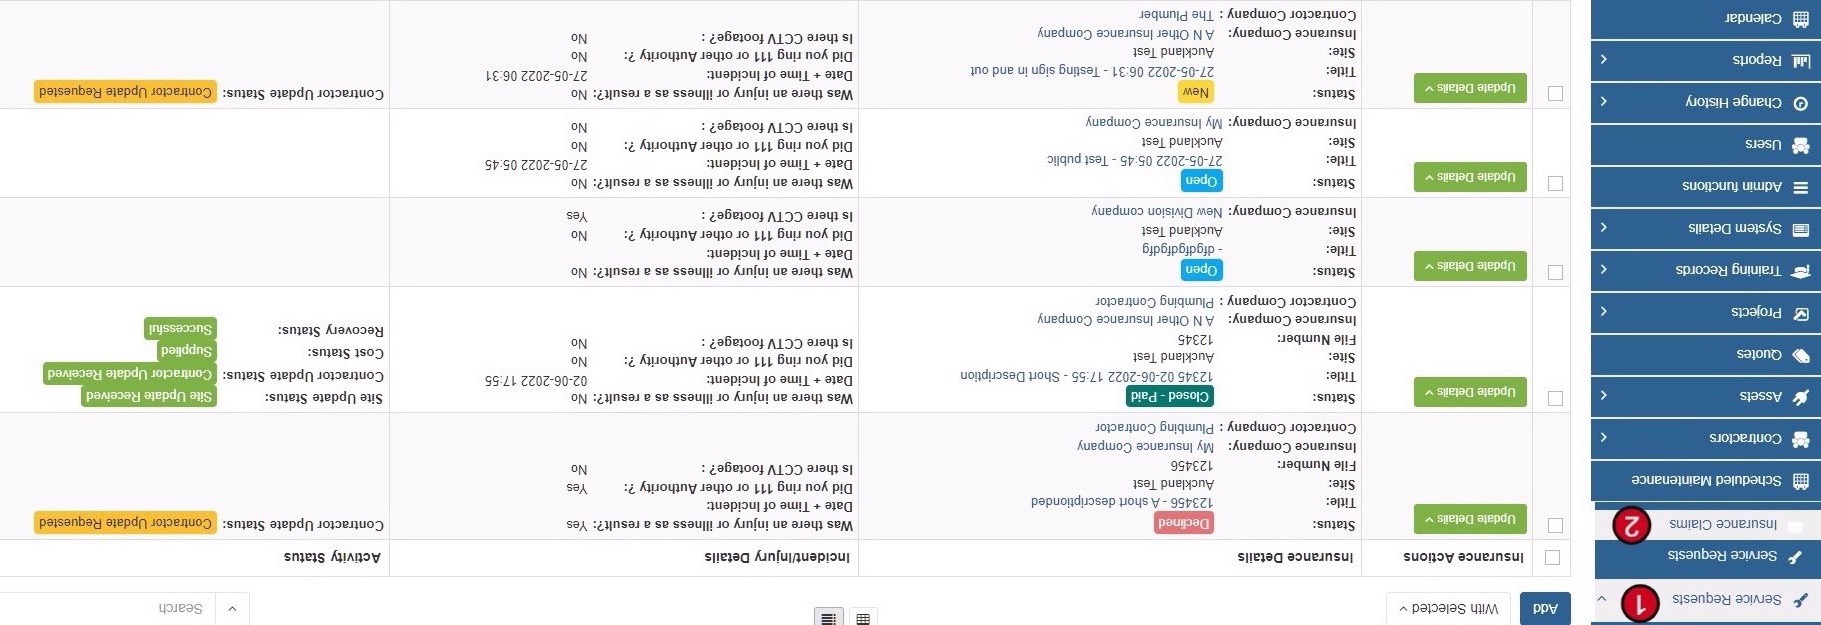
View All Claims
- Select Service Requests from the menu
- Select Insurance Claims
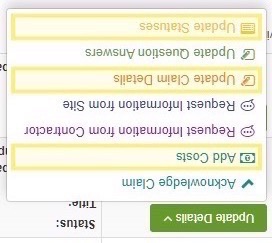
From the Insurance Claims list, you can:
- Update or request information from site and/or contractor
- Click the Title to view/edit full claim details
- Use the Update Details button for quick actions
Available Actions
Scenario #1: Full Collaboration Workflow
When Insurance Company, Site Manager, and Contractors are existing users in the system.
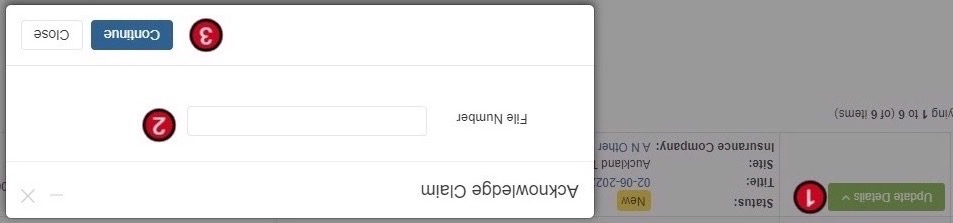
Acknowledge Claim
Acknowledgement confirms the Insurance Company is aware of the incident and a File/Reference number has been assigned.
- Click Update Details button
- Select Acknowledge Claim
- Add the File/Reference Number from Insurance Company
- Click Continue
Note: This button only appears when the current claim status is New.
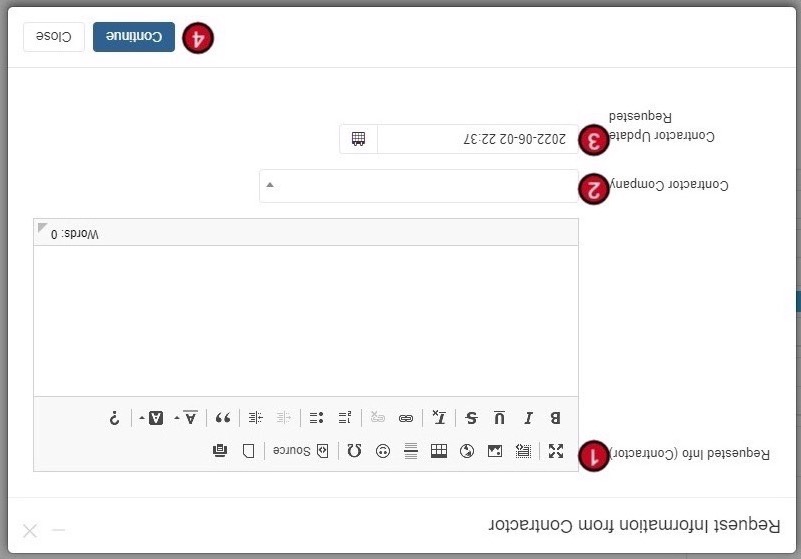
Request Information from Contractor
- Add details about what information you require
- Add/Adjust the Contractor Company
- Add the date you requested the Information (defaults to today)
- Click Continue
The Contractor will receive an email with a link to update the record in the system.
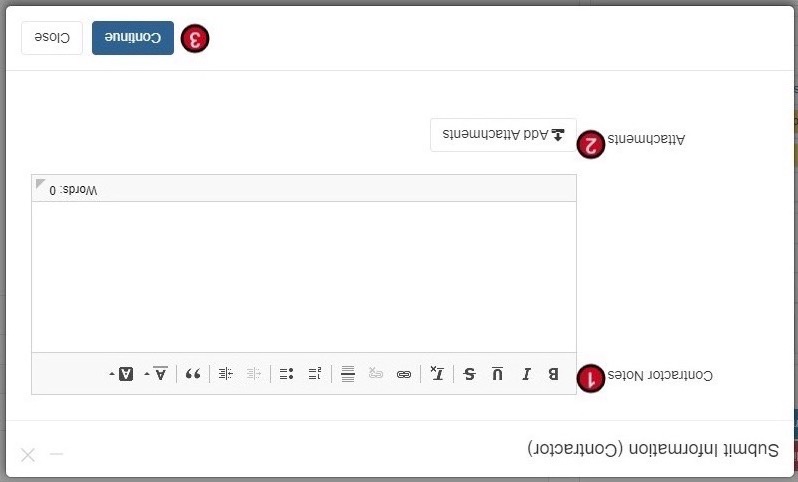
Contractor Submits Information
This button is only visible to the Contractor Admin:
- Contractor adds the requested details
- Contractor adds any relevant attachments
- Click Continue
The Helpdesk and Notified users will receive an email notification.
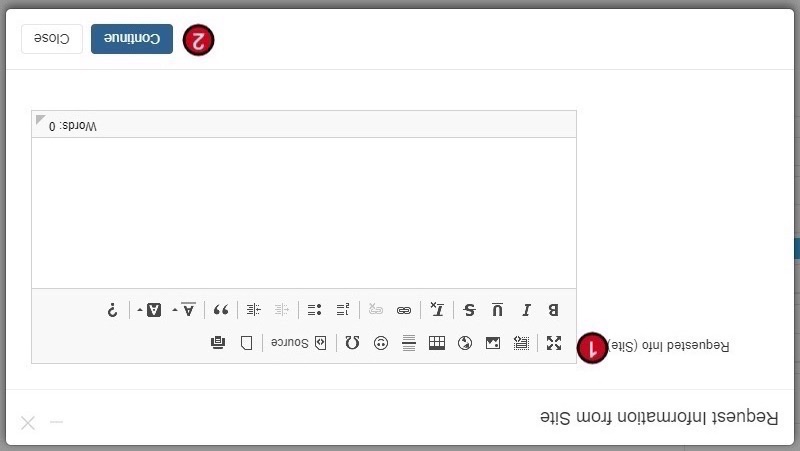
Request Information from Site Manager
- Add details about what information you require
- Click Continue
The Site Email will receive an email with a link to update the record.
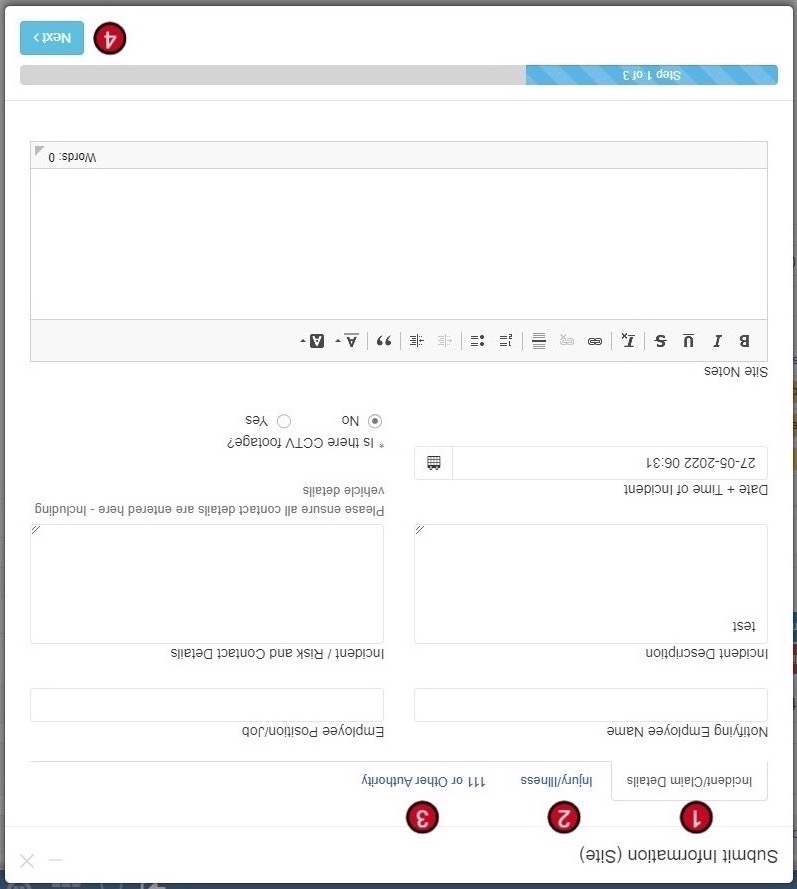
Site Manager Submits Information
This button is only visible to the Site Manager. They can update existing details and add new information across multiple tabs:
- Incident/Claim Details
- Injury/Illness
- 111 or Other Authority
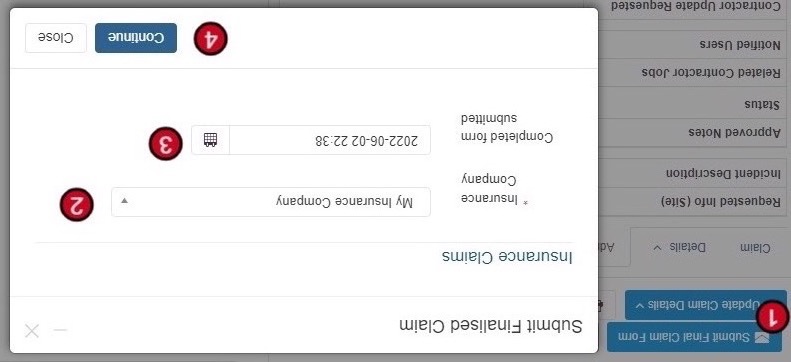
Submit Final Claim to Insurance Company
- Click Submit Final Claim Form
- Review/update the Insurance Company
- Review/update the submission date
- Click Continue
The Insurance Company receives all claim details and the completed claim form. If they have system access (Scenario #1), they can also request additional detail from Site or Contractor.
When the claim is Approved/Declined, the status auto-changes and notifications are sent.
Scenario #2: Manual Updates
Use this when managing an Insurance Claim outside of the system but still need to capture Milestone information for tracking or visibility.
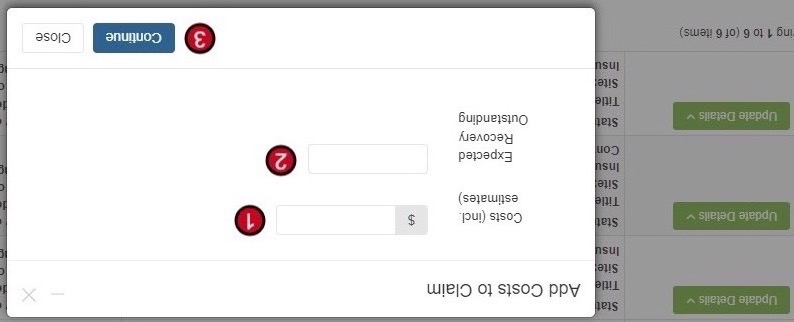
Add Costs
- Click Add Costs button
- Add/Update Costs (incl. estimates)
- Add/Update Expected Recovery Outstanding
- Click Continue
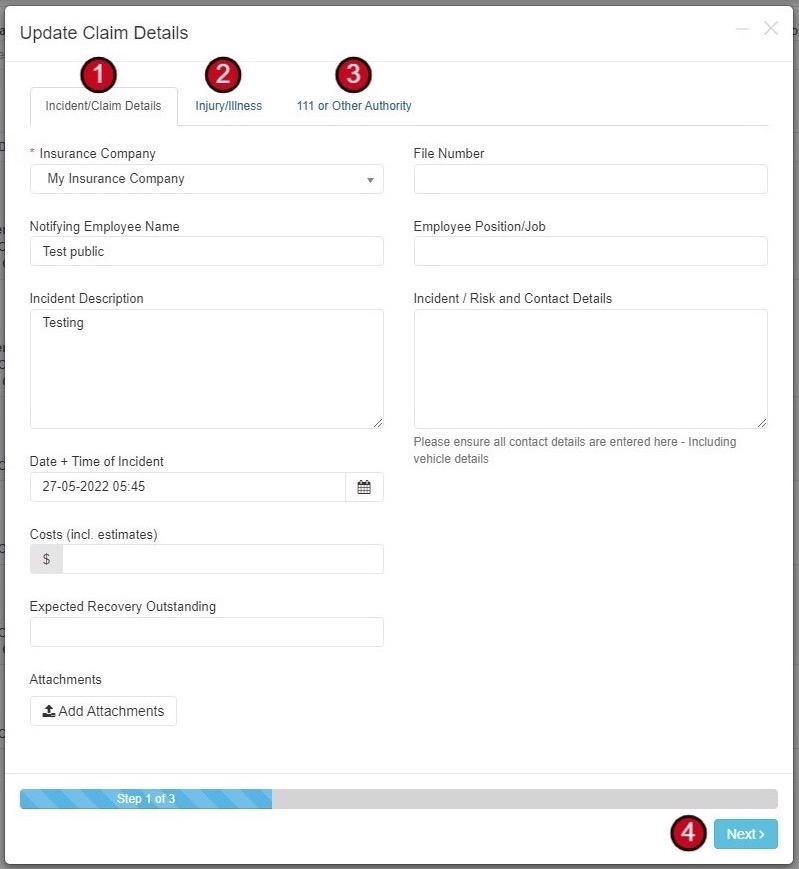
Update Claim Details
Click Update Claim Details to modify any information across three tabs:
- Incident/Claim Details - Insurance Company, File Number, Employee info, Description, Costs, Attachments
- Injury/Illness - Injury type, source, body parts, hospitalization
- 111 or Other Authority - Authority name, report number, contact details
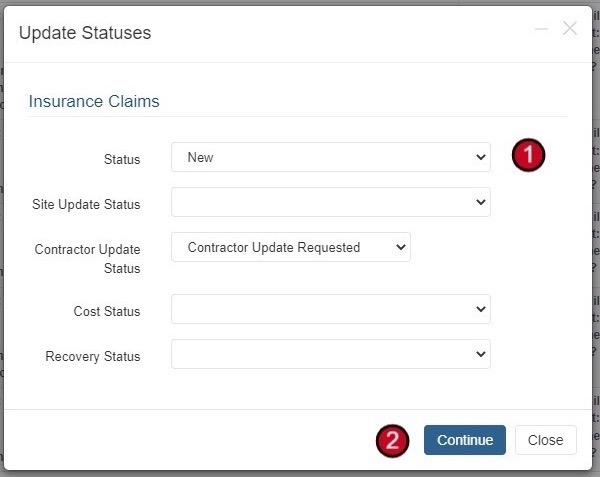
Update Statuses
Click Update Statuses to modify milestone and overall claim statuses:
| Status Field | Description |
|---|---|
| Status | Overall claim status (New, In Progress, Submitted, Approved, Declined, Closed) |
| Site Update Status | Status of information request from site |
| Contractor Update Status | Status of information request from contractor |
| Cost Status | Status of cost collection |
| Recovery Status | Status of recovery process |
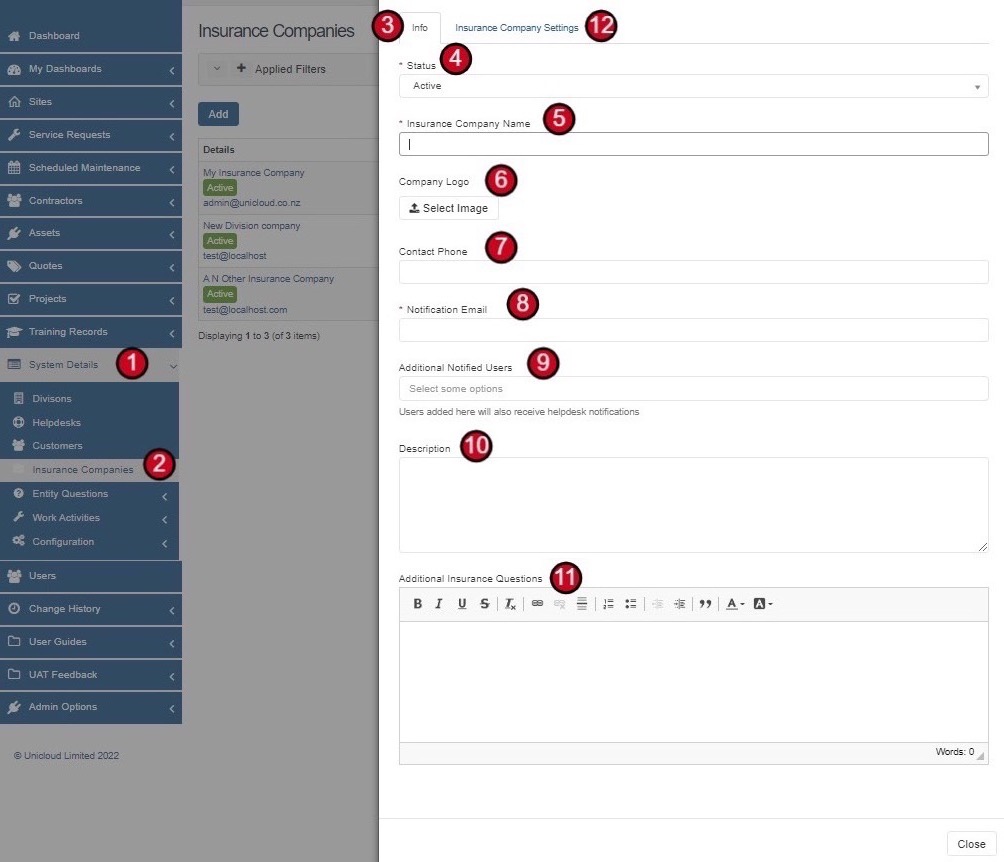
Adding a New Insurance Company
Step 1: Basic Information
- Click System Details from the menu
- Select Insurance Companies
- Click Add
- Set Status (Active by default)
- Add Insurance Company Name
- Add Company Logo (appears on Insurance PDF form)
- Add Contact Phone
- Add Notification Email (receives system notifications)
- Add Additional Notified Users if needed
- Add Description if required
- Add Additional Insurance Questions if required
- Click on Insurance Company Settings tab
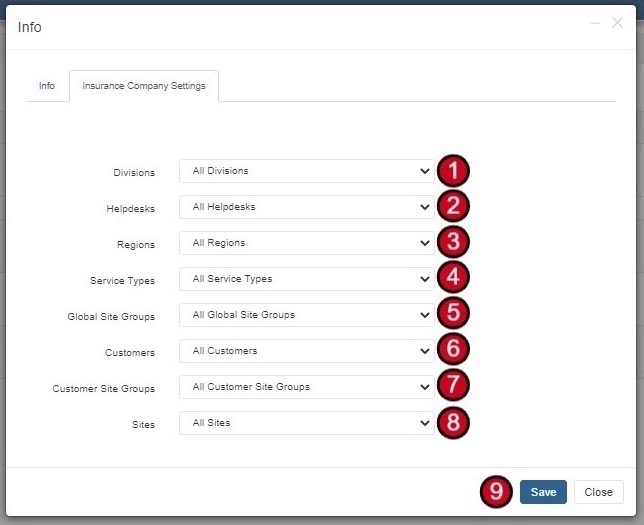
Step 2: Company Settings
Configure which entities this Insurance Company belongs to:
- Divisions
- Helpdesks
- Regions
- Service Types
- Global Site Groups
- Customers
- Customer Site Groups
- Sites
By default, these are set to ALL. Apply specific settings if needed.
Click Save to complete.
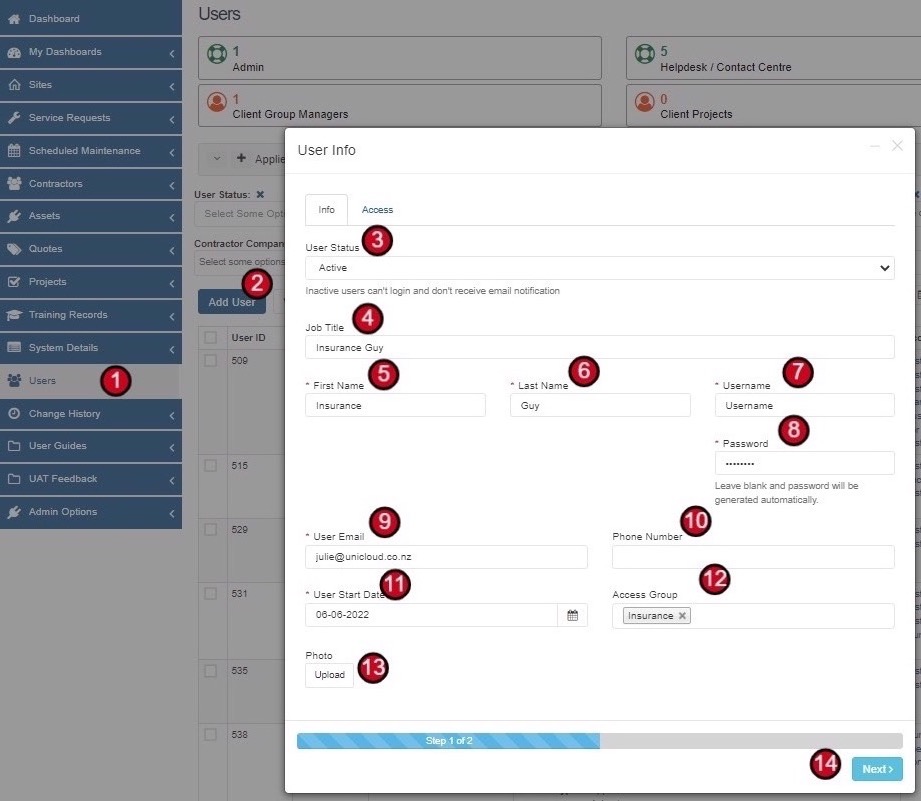
Adding Insurance Users
Create users who can interact with Insurance Claims on behalf of an Insurance Company.
Step 1: User Info
- Go to Users from the menu
- Click Add User
- Set User Status (Active)
- Add Job Title
- Add First Name and Last Name
- Add Username
- Add Password (or leave blank for auto-generation)
- Add User Email
- Add Phone Number
- Set User Start Date
- Set Access Group to Insurance
- Upload Photo if required
- Click Next
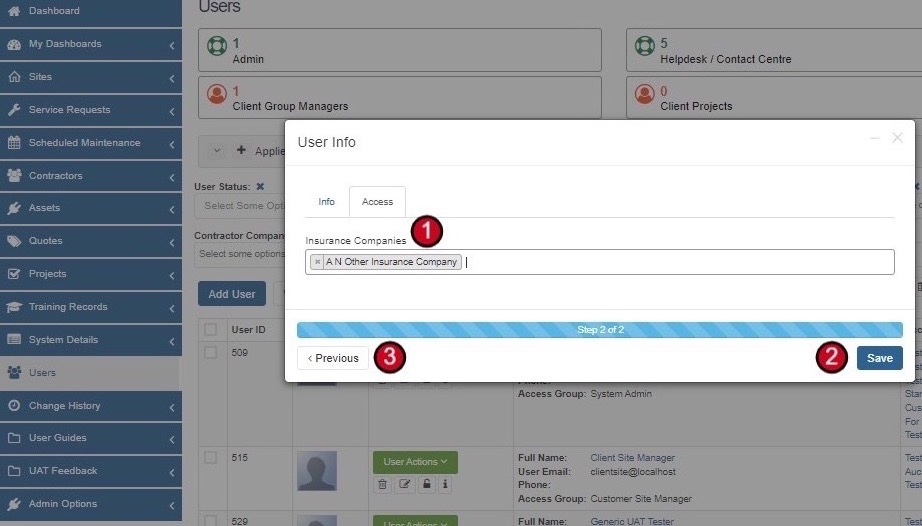
Step 2: Access Settings
- Select which Insurance Companies this user belongs to
- Click Save
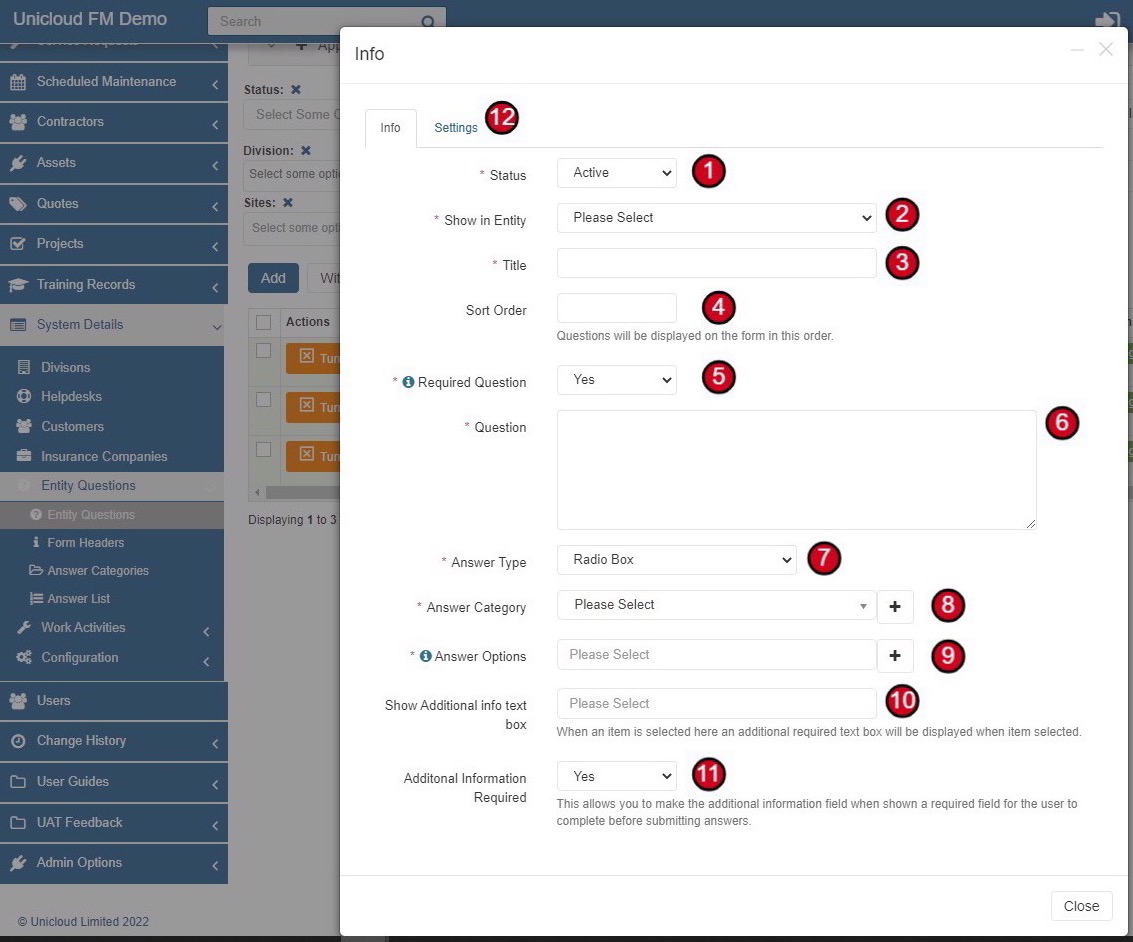
Adding Entity Questions
Create custom questions for your Insurance Claims process. These can be specific to your requirements or requested by clients/insurance companies.
Step 1: Question Setup
- Go to System Details > Entity Questions
- Click Add
- Set Status (Active by default)
- Set Show in Entity to Insurance Claims
- Add Title - Name of your question
- Set Sort Order - Display order on the form
- Set Required Question - Yes/No to make mandatory
- Write the Question
- Select Answer Type (Radio Box, Dropdown, Text, etc.)
- Select Answer Category if required (groups questions together)
- Add Answer Options for dropdown types
- Set Show Additional Info text box - Shows comment box when specific option selected
- Set Additional Information Required - Makes additional comments mandatory
- Click Settings tab
Step 2: Question Settings
Apply criteria for where this question appears:
- Divisions
- Customers
- Contractors
- Insurance Companies
- Regions
- Service Types
- Helpdesks
- Customer Site Groups
- Global Site Groups
- Sites
By default, questions apply to ALL categories. Click Save to complete.
