Quote Management & Workflows
Learn how to create, manage, and process quotes for all types of facilities management work including service requests, project quotes, and contractor variations.
On this page
- Overview
- Quote Types
- Creating a New Quote
- Adding Quote Details
- Adding Financial Information
- Adding Stakeholders
- Adding Related Items
- Customer-Created Quotes
- Creating Quotes from Contractor Jobs
- Send for Review
- Send for Approval
- Approving Quotes
- Deferring Quotes
- Declining Quotes
- Cancelling Quotes
- Archiving Quotes
Overview
Managing quotes in the Facilities Management industry involves handling various quote types and business processes. Facilitease provides a comprehensive quote management system that supports multiple quote types, flexible workflows, and contractor involvement throughout the process.
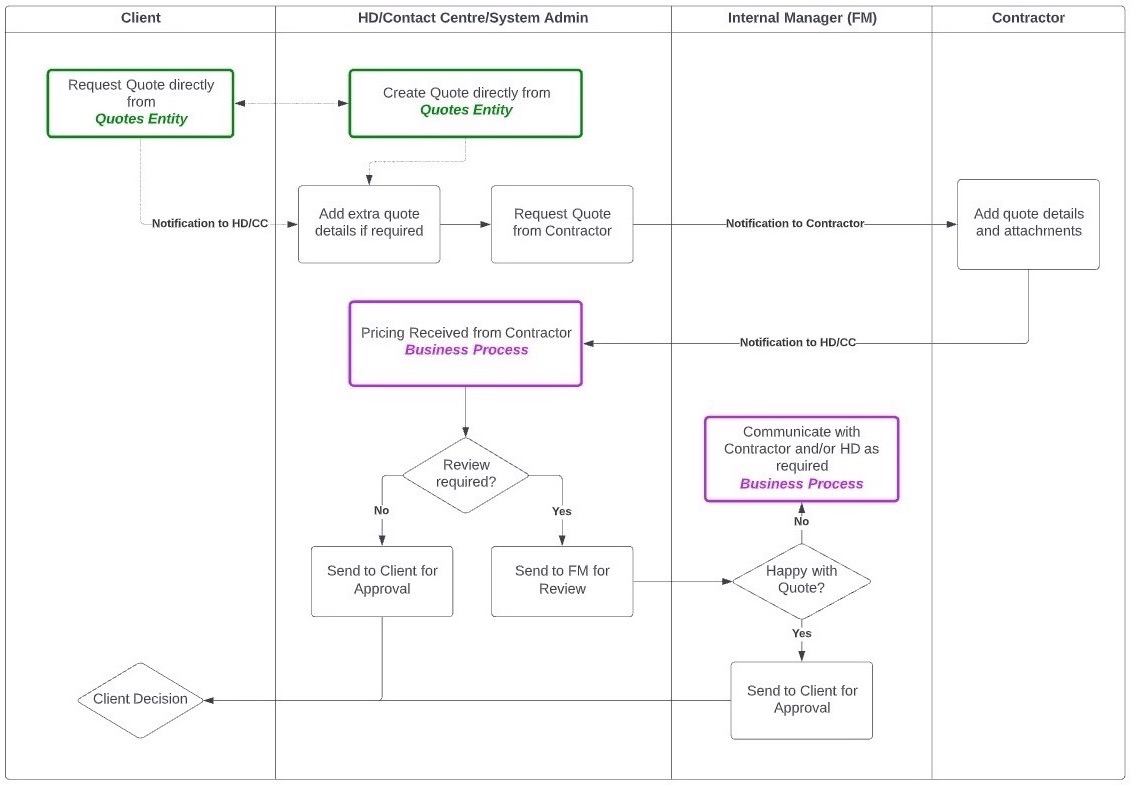
Flexible Quote Management: Quotes can span multiple sites and/or assets with automatic linking to contractor jobs and service requests where applicable.
Quote Status Flow
Alternative outcomes: Declined Deferred Cancelled
Quote Types
The system supports various quote types to cover all facilities management scenarios:
Creating a New Quote
There are two main ways to create quotes: directly from the Quotes entity or from an existing Contractor Job.
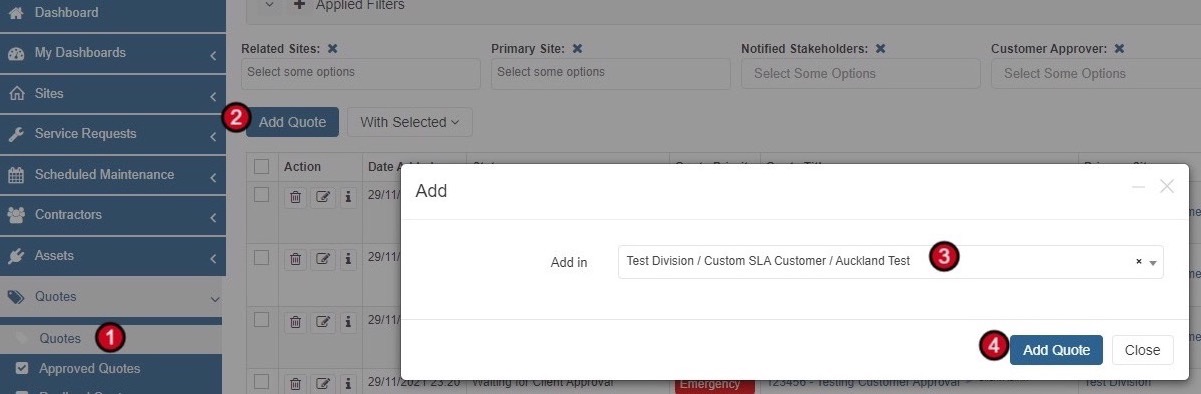
Create from Quotes Menu
-
Navigate to Quotes
Select Quotes from the side navigation menu, then click on Quotes submenu.
-
Add New Quote
Click the Add Quote button at the top of the quotes list.
-
Select Site
Choose the relevant site from the dropdown. Use the search function to quickly find the site.
-
Confirm Creation
Click Add Quote to create the quote. A new window will appear for entering further details.
Adding Quote Details
The quote creation wizard guides you through a 5-step process. The first step captures essential quote information.
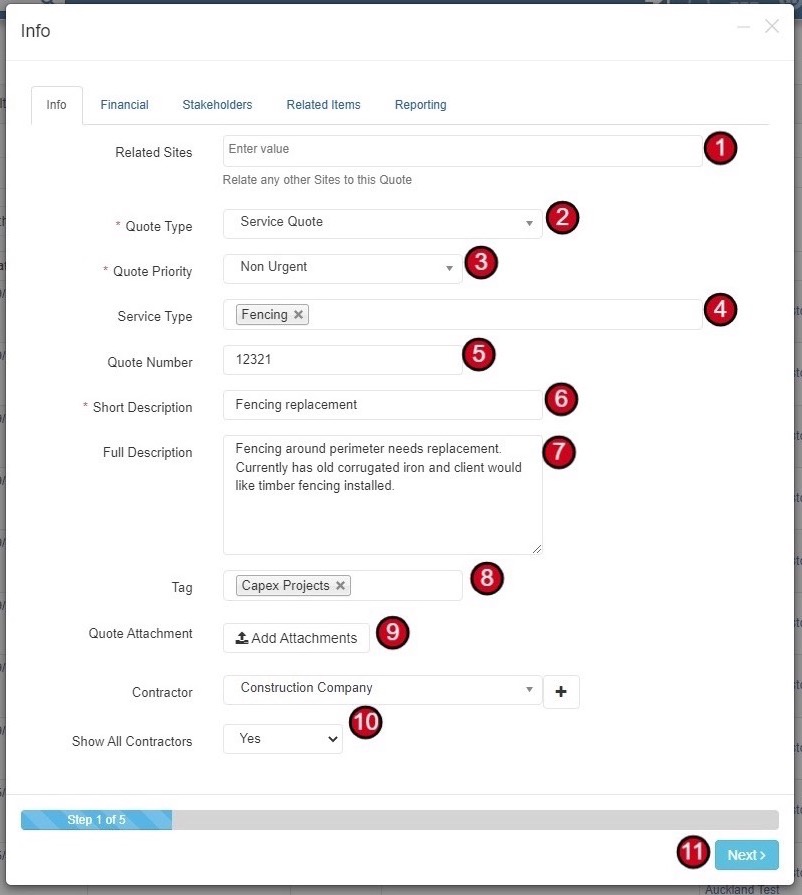
Info Tab Fields
| Field | Required | Description |
|---|---|---|
| Related Sites | No | Select any additional sites related to this quote |
| Quote Type | Yes | Select the type of quote (Service Quote, Project Quote, etc.) |
| Quote Priority | Yes | Set priority level (Non Urgent, Urgent, Emergency, etc.) |
| Service Type | No | Add service types for trend analysis across trades (e.g., Fencing, Electrical) |
| Quote Number | No | Enter your custom quote number or reference |
| Short Description | Yes | Brief summary of what's needed |
| Full Description | No | Detailed description of the quote requirements |
| Tag | No | Add tags for categorization (e.g., Capex Projects) |
| Quote Attachment | No | Upload any supporting documents |
| Contractor | No | Select contractor if known at this stage. Use "Show All Contractors" to see the complete list |
Contractor Selection Tip: If your required contractor doesn't appear in the dropdown, enable "Show All Contractors" to see contractors from outside the site's usual service area.
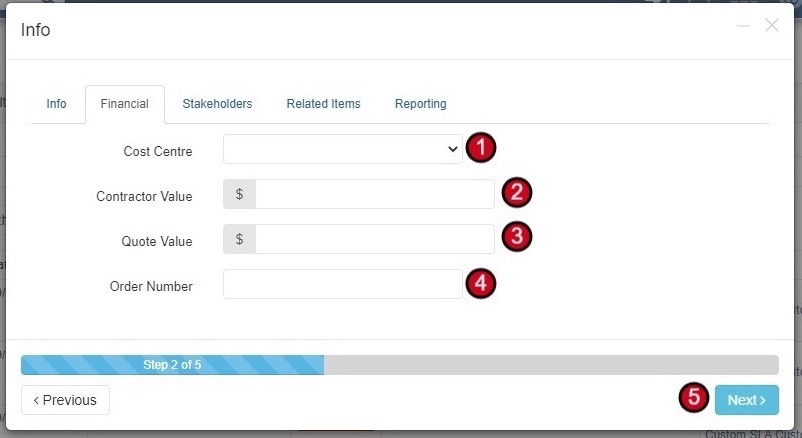
Adding Financial Information
Step 2 captures the financial details of the quote. These fields can be updated at any stage of the quote process.
| Field | Description |
|---|---|
| Cost Centre | Select the appropriate cost centre for budget allocation |
| Contractor Value | The value quoted by the contractor (in dollars) |
| Quote Value | The final quote value presented to the customer (may include markup) |
| Order Number | Purchase order or reference number if available |
Adding Stakeholders
Step 3 defines who is involved in the quote process and how they should be notified.

Customer Contact Information
You can also capture customer contact details for the quote:
- Customer Site Contact Name - Select from existing site contacts
- Customer Contact Name - Manual entry for contact name
- Customer Contact Number - Phone number for the contact
- Customer Contact Email - Email address for correspondence
Adding Related Items
Step 4 allows you to link the quote to other entities in the system for complete traceability.
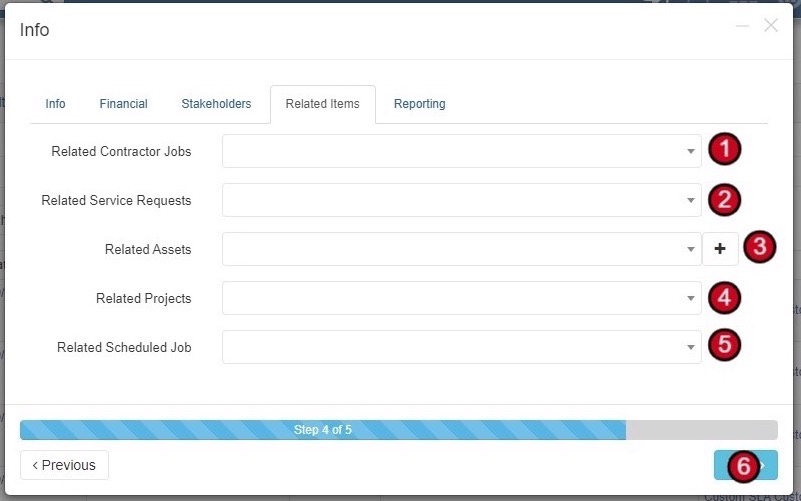
Flexible Linking: All related items can be added at a later stage if not known during initial creation. When quotes are created from contractor jobs, relationships are linked automatically.
Click Save to complete the quote creation process.
Customer-Created Quotes
Customer Administrators have the ability to request quotes directly through the system. This typically occurs when a customer wants you to provide pricing for work.
What Happens When a Customer Creates a Quote
-
Customer Submits Request
The customer goes through the same quote creation steps but with fewer fields due to access restrictions.
-
Helpdesk Notification
The associated Helpdesk automatically receives an email alert about the new quote request.
-
Add Details
The Helpdesk can add additional details to the quote or send it straight to a contractor for pricing.
Sample Quote Request Email
New Quote has been created, Please review the detail and request quote from contractor when ready
URL: https://portal.facilitease.com/quotes/view/58-20
Can we please have a quote to replace all the fencing on our boundary line
Creating Quotes from Contractor Jobs
Quotes can be initiated directly from existing contractor jobs, either by the contractor submitting a quote or by the Helpdesk requesting one.
Automatic Linking: When a quote is created from a contractor job, the system automatically links it to the related scheduled job, service request, contractor job, and asset (if assigned).
Request Quote from Contractor Job
-
Open the Contractor Job
Navigate to the contractor job from within a service request or the contractor jobs list.
-
Access Job Actions
Click on Job Actions from the contractor job panel and select Request Quote.
-
Complete Quote Details
Fill in the quote details including priority, reference number, description, tags, stakeholders, and any comments to send with the request.
-
Submit Request
Click Request Quote to send the request to the contractor.
Contractor Quote Submission
When a contractor submits their quote (either from their own contractor job or in response to a request), the associated Helpdesk receives an email notification.
Plumbing Contractor has submitted a quote for New Fence, Please click on the link below to view
URL: https://portal.facilitease.com/quotes/view/58-20
New Fence
Quote attached for full replacement of the boundary line fencing. Timber fencing to be installed at 1.2m high and roughly 150m2 in total
Send for Review
If your business process requires internal review before customer approval, you can send the quote for review.
Optional Step: The review step is optional. You can send quotes directly to customers for approval if your business process doesn't require internal review.
Available Action Buttons
-
Open the Quote
Navigate to the quote record from the Quotes list.
-
Click Send for Review
Click the Send for Review button at the top of the quote.
-
Verify Financial Values
Contractor Value is auto-filled but can be overridden. Add the Quote Value if not already entered.
-
Add Stakeholders
Add any Notified Stakeholders and select the Quote Reviewer who will review and send to customer.
-
Set Quote Expiry
Add a Quote Expiry date if not already set by the contractor.
-
Add Comments & Submit
Add any comments for the reviewer and relevant attachments, then click Continue.
The Quote Reviewer will receive an email notification and can access quotes pending review through dashboard reports.
Send for Approval
Once a quote is ready for customer decision, send it for approval. This can be done by the reviewer or directly by the Helpdesk/System Admin.
Action Buttons for Reviewed Quote
-
Click Request Client Approval
From inside the quote, click Request Client Approval.
-
Add Stakeholders
Add any Non-Notified Stakeholders (view access only) and Notified Stakeholders.
-
Select Customer Approver
Add the Customer Approver - this person will have access to the Approve/Decline buttons.
-
Add Comments & Submit
Add any comments for the approver and attachments, then click Continue.
Important: Only the designated Customer Approver will have access to the Approve/Decline buttons. System Admins can override this if needed.
Approving Quotes
While approval typically comes from a customer, any designated approver can approve a quote.
Approval Action Buttons
-
Click Approve Quote
From inside the quote record, click Approve Quote.
-
Add Order Number
Enter the purchase order or reference number if applicable.
-
Update Stakeholders
Add any Non-Notified Users for view access and update Notified Users as needed.
-
Add Approval Comments
Add any approval comments and attachments, then click Continue.
When a quote is approved, the associated Helpdesk automatically receives an email notification.
Deferring Quotes
Quotes can be deferred when a decision needs to be postponed. This puts the quote on hold until a specified review date.
-
Click Defer Quote
From inside the quote record, click Defer Quote.
-
Set Hold Review Date
Enter the date when you want to review this quote again.
-
Add Deferral Comments
Add any comments explaining the deferral reason and attachments, then click Continue.
Review Reminders: Dashboard reports and widgets will alert you to quotes that are due or coming up for review based on the Hold Review Date.
When a quote is deferred, the associated Helpdesk automatically receives an email notification.
Declining Quotes
When a quote is not accepted, it can be declined with feedback.
-
Click Decline Quote
From inside the quote record, click Decline Quote.
-
Update Notified Users
Add or change the users who should be notified of the decline.
-
Add Feedback
Add feedback or comments explaining the decline reason and any attachments, then click Continue.
When a quote is declined, the associated Helpdesk automatically receives an email notification.
Cancelling Quotes
Quotes can be cancelled by internal users. Customers must request cancellation, which is then actioned by the Helpdesk.
Customer Cancellation Requests: Customers cannot cancel quotes directly. They use the "Request Cancellation" button, which alerts the Helpdesk to complete the cancellation.
-
Click Cancel Quote
From inside the quote record, click Cancel Quote.
-
Update Notified Users
Add or change the users who should be notified of the cancellation.
-
Select Cancellation Reason
Choose a reason for the cancellation from the dropdown list.
-
Add Comments
Add any feedback or comments and attachments, then click Continue.
When a quote is cancelled, all Notified Users and Assigned Users will receive notification.
Archiving Quotes
Archiving removes quotes from active reports and counters while preserving the data. Quotes can be archived individually or in bulk.
When Can Quotes Be Archived?
The Archive button only appears when a quote has reached a terminal status:
- Approved
- Cancelled
- Declined
Quotes in progress (New, Submitted, Under Review, Waiting for Approval) cannot be archived.
Archive a Single Quote
-
Navigate to Quotes
Select Quotes from the menu, then select Quotes again.
-
Open Quote Actions
Click on Quote Actions for the quote in the listing.
-
Archive Quote
Select Archive Quote from the dropdown menu.
Bulk Archive Quotes
To archive multiple quotes at once:
- Select multiple quotes using the checkboxes
- Hover over the With Selected dropdown
- Select Archive Quote
Automatic Archiving: Quotes are automatically removed from certain reports once they have been in a terminal status (Approved, Cancelled, or Declined) for 12 months or longer. Quotes still in progress are never auto-archived.
Effects of Archiving
- Archived quotes are highlighted in the listing view
- Excluded from counters and dashboard widgets
- Excluded from standard reports
- Data is preserved and can still be accessed if needed