Log Service Request from QR Code
Learn how to quickly log service requests by scanning QR codes on sites and assets, and how to generate QR codes for your locations.
Overview
Facilitease allows you to generate QR codes for both Sites and Assets. When scanned, these QR codes streamline the service request process by automatically selecting the correct location and asset.
Benefits of QR Codes:
- Ease of logging - No need to search for locations
- Automatic site selection - Minimises user error
- Reduced risk - Prevents selecting the incorrect site
- Fast reporting - Perfect for mobile users on-site
Site QR Code
Auto-selects the site location when logging a service request
Asset QR Code
Auto-selects both the site AND the specific asset
QR Code Types
There are two main types of QR codes you can generate in Facilitease:
| QR Code Type | Available On | What It Does |
|---|---|---|
| Log Service Request QR Code | Sites | Opens the service request form with the site pre-selected |
| Asset QR Code | Assets | Opens the asset record to view details (requires login) |
| Reactive Job QR Code | Assets | Opens the service request form with site AND asset pre-selected |
Scanning QR Codes
To log a service request using a QR code, follow these simple steps:
- Open Your Camera App - On your mobile device, open the camera app. Most modern smartphones can scan QR codes directly through the camera.
- Point at the QR Code - Aim your camera at the QR code displayed on the site or asset label. Hold steady until the code is recognised.
- Tap "Follow Link" - When the QR code is detected, a notification or link will appear. Tap it to open Facilitease.
- Log In (if required) - If you're not already logged in, enter your Facilitease credentials to continue.
- Complete the Service Request - The service request form will open with the location (and asset, if applicable) already selected. Fill in the remaining details and submit.
QR Scanning on Printed Labels: The text on QR labels includes instructions: "To scan QR code open the camera app on your phone and scan the code then click 'follow link'"
Site QR Codes
Site QR codes allow users to log service requests with the site automatically selected. This is ideal for placing at building entrances, reception areas, or common spaces.
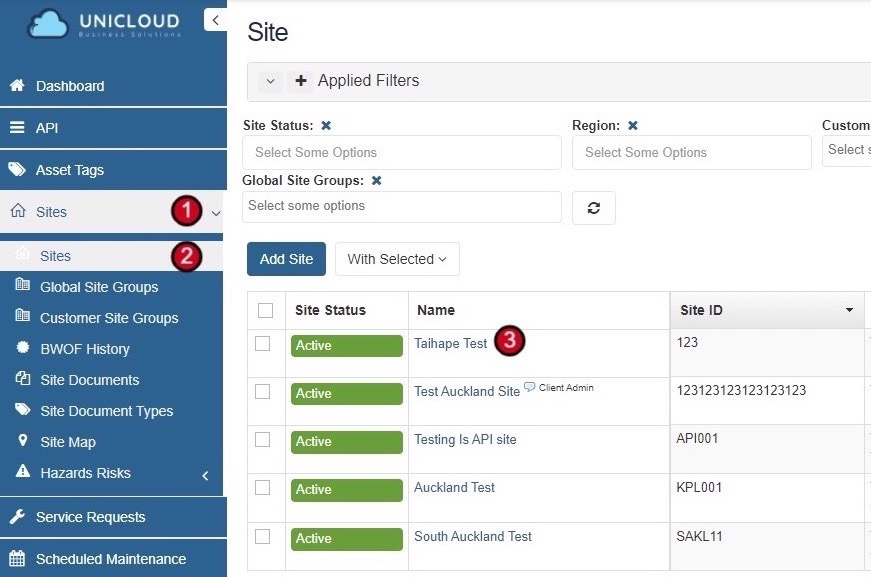
Generating a Site QR Code
- Navigate to Sites - Select Sites from the main menu, then select Sites again from the side menu.
- Select the Site - Click on the site you want to generate a QR code for to open the site record.
- Access the Print Menu - From inside the site record, hover over the Print button to reveal the print options.
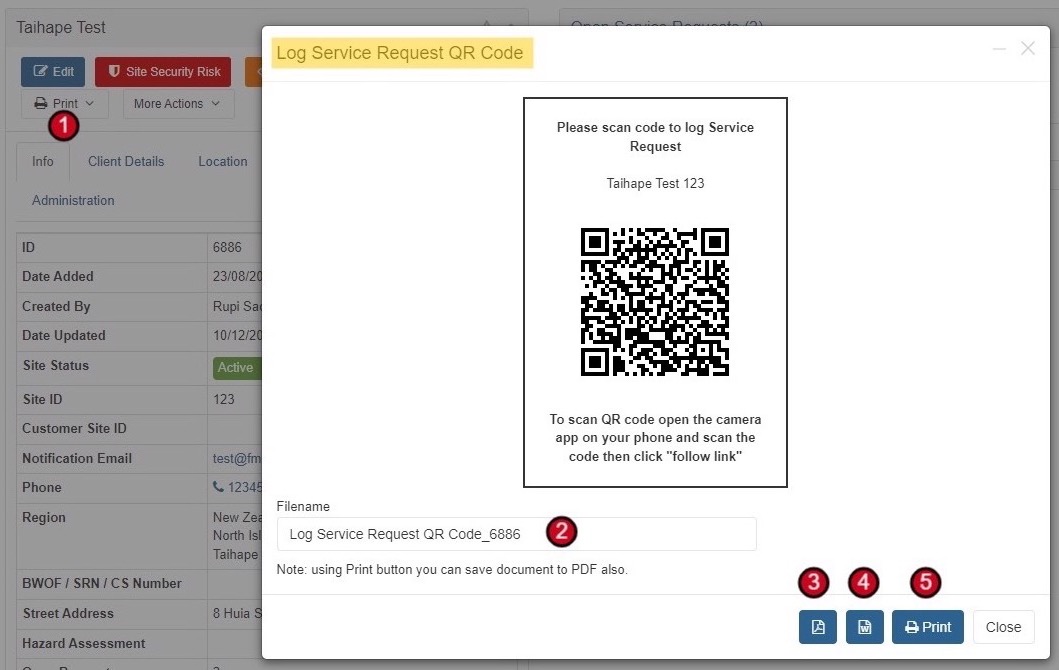
- Select "Log Service Request QR Code" - Click on the Log Service Request QR Code option to open the QR code dialog.
- Customise Filename (Optional) - You can give the file a custom name or use the default filename provided.
- Download or Print - Choose your preferred format: Download as PDF, Download as Word document, or Send directly to Print.

Bulk Site QR Codes: You can also generate QR codes for multiple sites at once. Simply select all the sites you want by ticking the checkbox next to each, then use the With Selected menu to print QR codes in bulk.
Asset QR Codes
Asset QR codes work similarly to site codes, but also include the specific asset information. There are two types of asset QR codes available.
Asset QR Code vs Reactive Job QR Code
Asset QR Code
Scanning this QR code will take you into the system and show you the asset record.
Note: This will require you to log in using your credentials.
Reactive Job QR Code
Scanning this QR code will take you directly to the Job logging form and will automatically link the site and associated asset.
Best for: Quick fault reporting on equipment
Generating Asset QR Codes
- Navigate to Assets - Select Assets from the main menu, then select Assets again from the side menu.
- Select the Asset - Click on the asset you want to generate a QR code for to open the asset record.
- Access the Print Menu - From inside the asset record, hover over the Print button.
- Select QR Code Type - Choose either Asset QR Code (to view asset details) or Reactive Job QR Code (to log a service request).
- Customise and Download - Optionally customise the filename, then download as PDF, Word document, or print directly.


Bulk Asset QR Codes: For printing QR codes for many assets at once, see the Bulk Print QR Labels admin guide.
Downloading & Printing QR Codes
QR codes can be downloaded in multiple formats to suit your needs.
Available Download Options
| Format | Best For | How to Use |
|---|---|---|
| Direct printing, archiving | Click the PDF icon in the QR code dialog | |
| Word Document | Editing, adding to other documents | Click the Word icon in the QR code dialog |
| Immediate printing | Click the Print button to send directly to printer |
Save as PDF from Print: Using the Print button, you can also save the document to PDF through your browser's print dialog if you need an alternative PDF format.
QR Label Content
Generated QR labels include:
- Title indicating the purpose (e.g., "Please scan code to log Service Request")
- Site or Asset name and ID
- The QR code image
- Instructions for scanning
- Additional asset information (for asset codes): Warranty Expiry, Install Date
ASSET002